LPKF PCB Milling Machine - S62
Back to Tools : Mills and CNC Routers
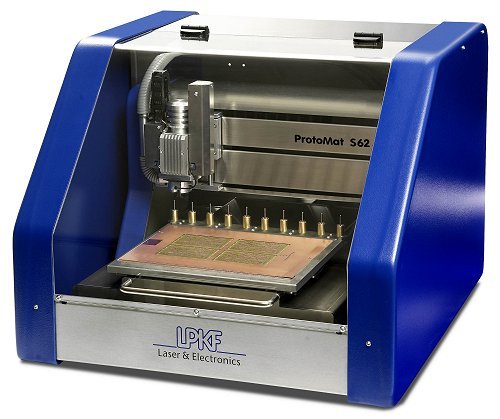
Before our LPKF Protomat S104 PCB mill, this LPKF Protomat S62 PCB mill was in use at our Fab Lab from 2009 until 2022, when it was moved to the RWTH Excellence Startup Center Collective Incubator (contacts: Aron Heibges, Clarissa Wagner). This documentation is kept for archival purposes.
The S62 can produce double-sided PCBs from Eagle layouts exported as Gerber files. A small 5x5 cm board takes about 10 minutes per side.
Tool change happens automatically, a camera system helps align dual-sided boards, and a vacuum table holds down your board. A kit for through-hole plating of vias is also available, and for SMD boards, the mill can create solder paste stencil foils down to .4 mm pitch connectors.
The material costs 15 cents (single-sided) or 30 cents (double-sided) per square centimeter, based on the rectangular bounding box around your board. That's under 4 Euros for a 5x5 cm single-sided board.
In principle, the LPKF can also cut and engrave other materials like plexiglass (acrylic), some other plastics, and soft metals such as brass and aluminum. Maximum height for these materials is 38 mm for engraving, or around 12 mm for cutting. Cutting and engraving work with vector drawings exported to HP-GL plotter or Autocad DXF format, among others. However, we have other mills and lasercutters that are more suited to this purpose, and especially the lasercutter is much easier to use than any mill, so we leave the LPKF calibrated for PCB material (calibrating it is a pretty time-intensive process).
If you would like to use the mill, just email Marcel Lahaye.
Manuals and Documentation
- PCB Milling Tutorial
- Complete manuals and documentation (internal)
- Mill administrator pages (internal)
- More details, a product brochure, and demo videos can be found on the manufacturer's S62/S63 product page.
Milling software
You use two applications on the milling station computer: CircuitCAM PCB to fine-tune your data before milling, and BoardMaster to run the actual milling job. Demo versions of both applications are available from these links.
CircuitCAM uses our own "rwth_easy" template by default. This template should be used if you want to create single-sided or double-sided PCBs exported by Eagle. Only the available tools (see below) will be used. If you need to use the milling machine for more advanced PCBs or other materials please use a different template (File->New...) and contact Jan Thar.
Both applications are Windows applications, so they are installed inside a Parallels Virtual Machine on our Mac mini that is used for the milling machine. To keep the installation clean and working, please do not use the Windows virtual machine for any other purposes than running those two applications. Use Eagle on the Mac natively, not under Windows.
Tools
We use 10 standard tools in the automatic tool changer —please do not change them:
- Universal Cutter 0.2 mm marking
- Universal Cutter 0.2 mm
- Spiral Drill 0.6 mm
- Spiral Drill 0.7 mm
- Spiral Drill 0.8 mm
- Spiral Drill 0.9 mm
- Spiral Drill 1.0 mm
- End Mill 1.0 mm
- Contour Router 1.0 mm
- Contour Router 2.0 mm
To place fiducials on your board that help align both sides of a double-sided board, use BoardMaster, not CircuitCAM. You'll need a Spiral Drill 1.5 mm.
The Contour Router tools can create holes of any dimension. For example, 2.3 mm holes use the Contour Router 2.0 mm, and 1.6 mm holes use the Contour Router 1.0 mm.
These tools can only be used with PCBs. Do not cut plastics with them—this will destroy them, and they're expensive.
If a tool needs to be changed please contact a Fab Lab Administrator so we can help and keep track. Do not attempt to change it on your own. Used tools must be marked.
Creating export files from Eagle board layouts
- Download the two attached files (see attachments at the end of this page)
- Put them into /Applications/EAGLE/cam (on the Mac) or C:\Program Files\Eagle 5.6.0\cam or similar (Windows).
- Open your .brd layout in Eagle.
- Select File->CAM Processor, then File->Open->Job from the menu bar.
- Locate the LPKF_2Layer.cam file in the dialog, klick on "Drills to Excellon", now klick "Bohrertabelle" and locate the "LPKF.drl"-file in Eagles "cam"-folder" then click on Process Job. From Eagle 7 upwards you have to select Excellon_24 instead of Excellon as a device, otherwise the drills will be at wrong positons.
After this, Eagle has generated new files in the same folder as your .brd file. Locate them and copy them to the PCB mill computer.
On the PCB mill computer:
- Import the new .BOA, .TOP, .BOT and .DRD files to CircuitCAM.
Note: Under Windows you may have to locate the LPKF.DRL drill file before the job completes successfully.
Creating export files from KiCad
- Go to File -> Plot
- Set all values like in the picture
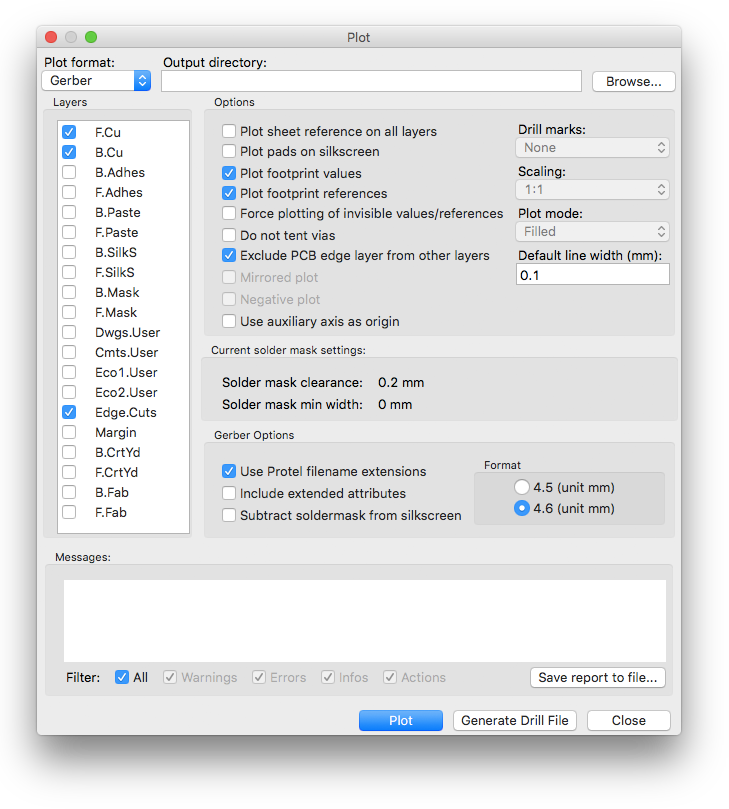
- Press Plot
- Press Generate Drill File
- Set all values like in the picture

- Press Drill File
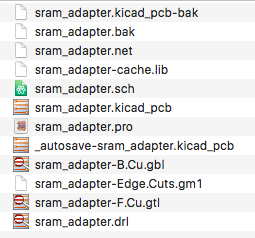
- Bring all the files from your project folder:
Creating vector drawings from bitmap PCB layouts
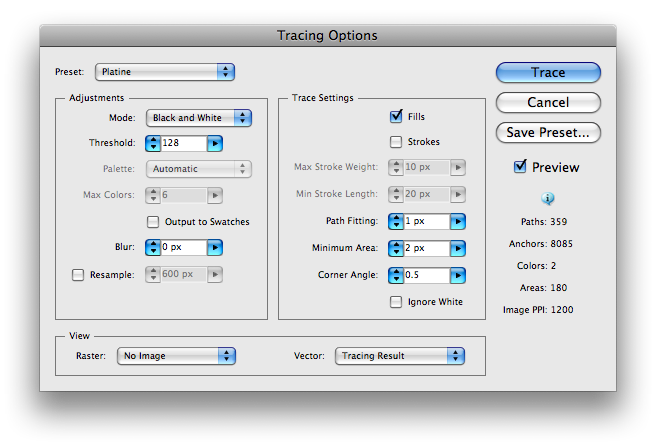
Sometimes PCB layouts or engravings are only available as black & white bitmaps. To use these on the mill, use this process in Adobe Illustrator (here CS4):
- Select File -> New... to create a new drawing. In the dialog, use the Print document preset options.
- File -> Place the bitmap file (I used this 1200 dpi black and white GIF for testing). It gets placed at 72 dpi.
- Object -> Transform -> Scale... the bitmap to its correct size (here: scale factor 72 dpi / 1200 dpi = 6%).
- Object -> Live Trace -> Tracing Options: Select the following options. I recommend storing them under a preset for future use.
Play with the Path Fitting, Minimum Area, and Corner Angle values if necessary. Try to minimize the number of Paths and Anchors to the right for faster milling, while keeping the resulting contour as close to the original as needed. The live Preview helps with this. - File -> Save the result as an Illustrator .ai file, then File -> Export it to an Autocad DXF file.
- The resulting file should be readable by the mill's CircuitCAM software, but will require post-processing in CircuitCAM to tell it where the holes to drill are, and at which lines to cut the board completely (such as at its outer border).