Audio and Video Equipment
Sony Camcorder
Our current camcorder is a Sony FS5 II (4K, HDR, 120 fps) purchased in 2019. It is usually kept in the video cupboard in a large bag. For video lectures during Corona, it is installed in Jan's office.
To get started, read the video crash course. For more information, consult the manual. ![]() Sony-FS5II-Manual.pdf
Sony-FS5II-Manual.pdf
If you want to use a tripod (from the video cupboard), make sure to grab the quick switch plate. It screws into the bottom of the camcorder, which can then be placed securely on top of the tripod.
There is quick way to set white balance temperature, documented as a tiny tip in the manual on page 56. Ensure that you are in manual mode ("Full Auto" off), the white balance indicator is shown in the display (otherwise hit the "WHT BAL" button), and that the white balance is set to "PRESET" (and not "A" or "B"). "PRESET" additionally needs to be set to "MANU WB TEMP" (via the camcorder menu "(CAMERA/PAINT)/WB PRESET"). Once you have set the camcorder to manual temperature white balance, you can use the "WB SET" button on the front of the camcorder which will highlight the temperature in white and now you can adjust it using the "SEL/SET" wheel.
The files are mirrored to both SD cards in the camcorder for safety and peace of mind. You can enable continous recording where when one card is full, the camcorder continues recording to the other card. More information is in the manual on page 41.
It appears that the battery drains when left on the camcorder, even when the camcorder is shut off. Investigate whether it is better to keep the battery off the camcorder, in order to keep it fully charged for when you don't have access to a power outlet.
The Camere has a full auto mode that allows it to select and adjust most settings automatically. (This does not include focus).
It can be turned on and off with the round FULL AUTO button on the top left side. When full auto is active, the green LED inside the button is lit and most settings cannot be changed manually.
A disadvantage of full auto is that, depending on the conditions, recorded beamer images may flicker.
To solve this problem, full auto has to be deactivated and the shutter has to be adjusted.
To adjust the camera shutter, make sure the camera is not in full auto mode (see above).
Then press the SHUTTER button. It is located on the left side of the camera, bottom left. Then use the vertical scroll wheel in the center left to adjust the shutter until the flickering stops.
iPhone
We have a dedicated video iPhone, mainly as a backup in case the camcorder fails. It is always charging in the HiWi room near the video iMac at the window.
If you want to use a tripod (from the video cupboard), make sure to grab a phone attachement and a quick switch plate. The plate screws into the attachement, which in turn holds the phone. This setup can then be securely placed on a tripod.
Note that it can be tedious to get the recordings off the iPhone. The easiest appraoch is to connect it via USB to a Mac and use Photos or Final Cut to copy the recordings.
DJI Osmo pocket
The Osmo Pocket is a small handheld gimbal camera. Here is the complete manual.
Things you might need
The DJI Osmo Pocket. Some add-ons: the Contoller Wheel, the Wireless Module, the smartphone adapter. And the video iPhone or another smartphone with a copy of the DJI Mimo App.
Opereating styles
The Osmo can be operated in three styles:
- As a standalone device: Just take the Osmo and turn it on by holding the button right next to the button with the red dot. Acces different menus by swiping to different directions on the screen. Mainmenu (down), recording mode (left), gallery (right), gimbal shortcuts (up). For better motion control, add the Controller wheel, by sliding it on from left to right at the contacts in the middle of the Osmo (something else might already be on there). The controlls of the Motion Wheel are explained below.
- Connected directly to a smartphone: It is possible to connect a smartphone directly to the Osmo. Do this by mounting the small smartphone adapter on the middle part of the Osmo. Slide it in place from left to right, so that the contact points to the left. This setup allows you to held smartphone and Osmo as one unit in both hands, which might result in more stable shots. However the connection is not that stable in itself, and i prefer the third option.
- Connected wireless to a smartphone: Connect the wireless module (it looks like a black egg cup) to the bottom of the Osmo. Make sure the the small smartphone adapter is not connected activly at the middle of the Osmo (the contact should not stick out to the left). This allows you to control the osmo remotely, by using the Osmos WLAN and the app.
Recording Modes
- Photo: The Osmo can be used to take photos. Boring.
- Video: The Osmo can record videos. Per defaut those have 1080p resolution and 30 frames per second. 4k and other frame rates are also possible.
- Slow motion: The Osmo can record videos in 4-times slow motion at 1080p, with lower picture quality.
- Hyperlapse: The oposite of slow motion. Speeds between 2x and 30x can be selected.
- Pano: Takes 4 photos in different directions and stiches them together to get a 180 degree panorama photo.
- Timelapse: Makes it possible to create slowly moving, fast shots. Up to four path points can be specified. The Osmo will follow those in the specified time. Intervall and shooting duration can be selected and the length of the final shot is shown. Example: Intervall 20s, Duration 5h will result in a 30s shot.
Gimbal control modes
You can chose between fast follow and slow follow. This effects how smooth the camera turns vs. how responsive it is. For most projects here slow follow is the better option.
There are also different axis control modes:
- Follow: Follows wherever you point the camera, and holds the camera straght. (Good for most shots)
- FPV Mode: Like Follow, but the horizon is not automatically straight. (Good for action or top down shots)
- Tilt Lock: The camera will turn to left and right, but it will not follow up and down tilting. (Good for slider like shots)
Another great feature is called active track. It will always keep the camera pointed at a defined object and keep it in focus. Double tap at the object on the Osmo touch screen, or mark it by toch-sliding over it in the app.
This are the controlls when using the Controll Wheel add-on:
- Use the small switch on the bottom left to select the axis you want to control (Left/Right or Up/Down)
- Use the silver wheel to change the tilt speed of the camera in the selected axis
- Use the Left button to recenter the camera
- Hold the right button to let the camera freeze in its current absolute rotation until letting the button go (great for slider like shots). Press it to switch to selfie mode.
Zoom Audio Recorder
For recording audio, we use the Zoom H1n. It is kept in the video cupboard, usually in a pouch in a white box.
To get started, read the audio crash course. For more information, consult the manual.![]() Zoom-H1n-Manual.pdf
Zoom-H1n-Manual.pdf
The chair also has the predecessor, Zoom H1. It is kept in the admin's office. Similar to the H1n, it turns on by pulling a switch on the side, and recording is started and stopped with the big red button. In contrast to the H1n, the microphone sensitivity controls are buttons on the side. The play button and related controls are also on the side.
Video Cupboard
The video cupboard is located in the seminar room, next to the screen. One key is kept in the secretary's office and labeled "Seminarraum rechts." The other is in possession of the video HiWi to ensure easy access to the equipment, even when the secretary's office is closed.
Wireless Microphones

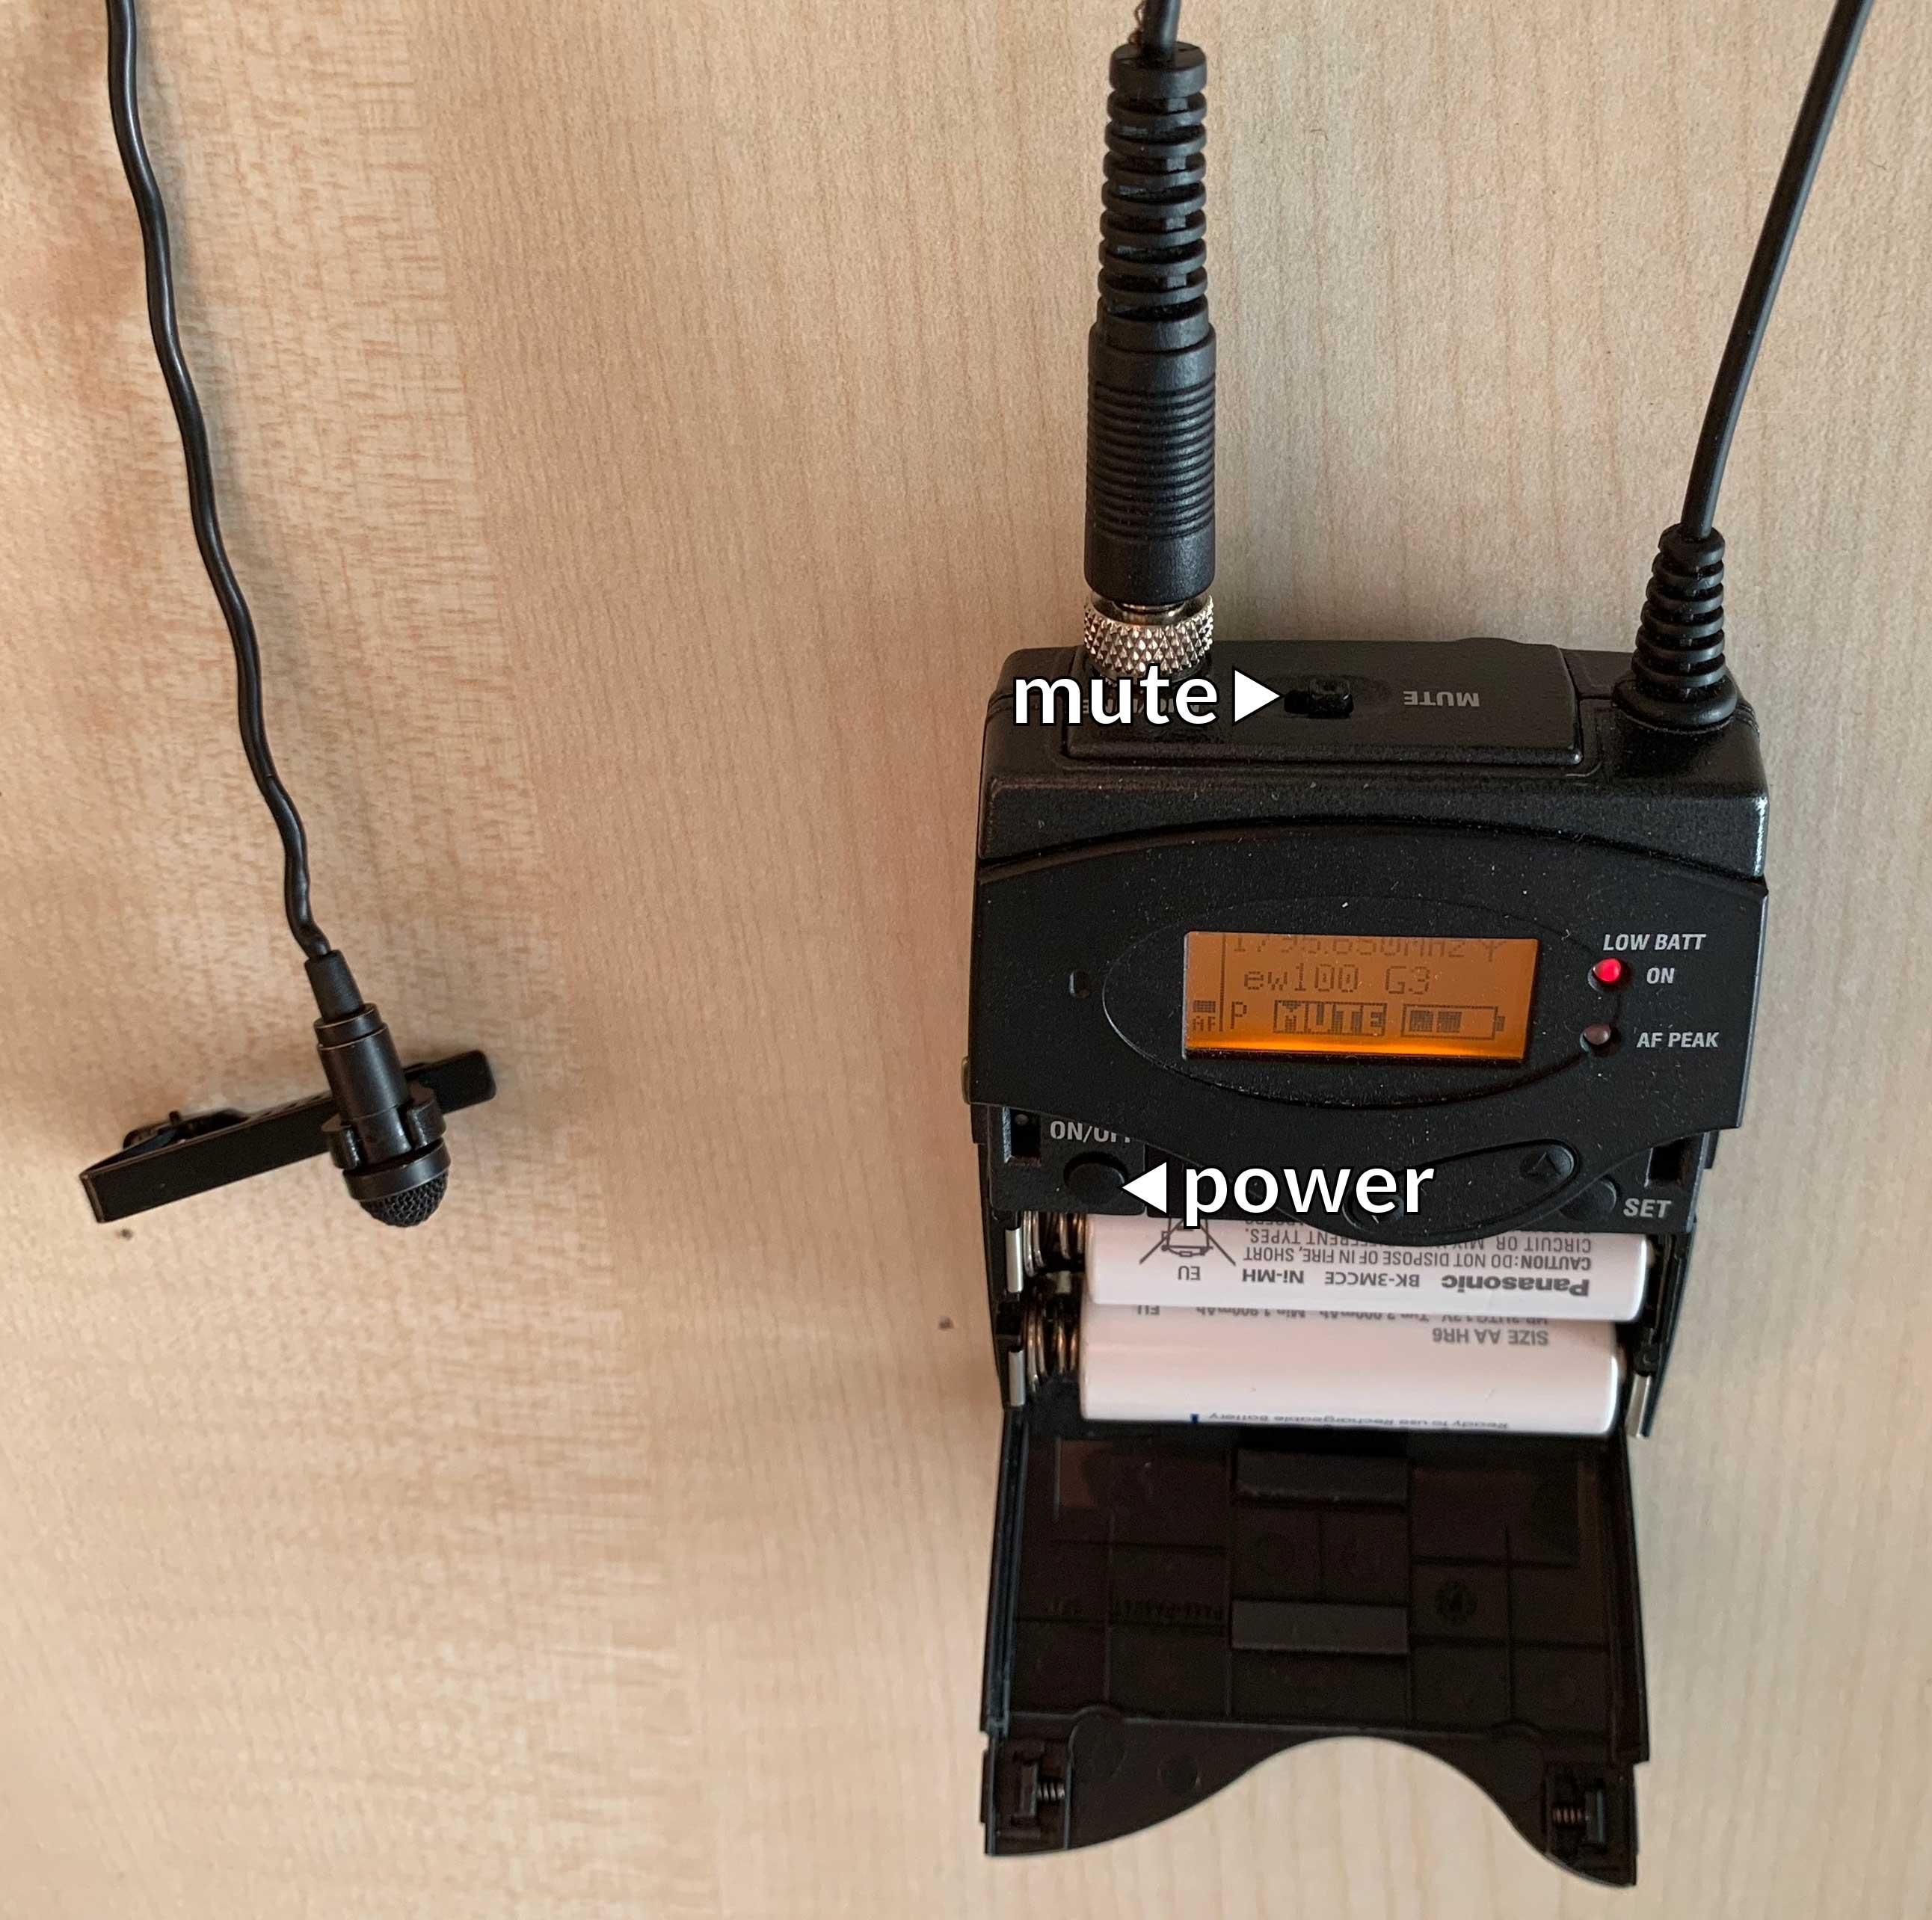
The two wireless microphones are powered via AA batteries, which are provided in holders on the speaker's desk. Change out the batteries with full ones, whenever possible.
To turn on a microphone's sender, you need to open the flap on the front and hold down the power button inside, then close the flap. Make sure the speaker knows about the mute button on the top; give the microphone to them muted and tell them to unmute it when they start the presentation.
The microphone should be placed as close to the speaker's mouth as is convenient, but make sure that nothing rubs against it when the speaker moves around; typically a good spot is at breast level on the shirt.
Mixing Console
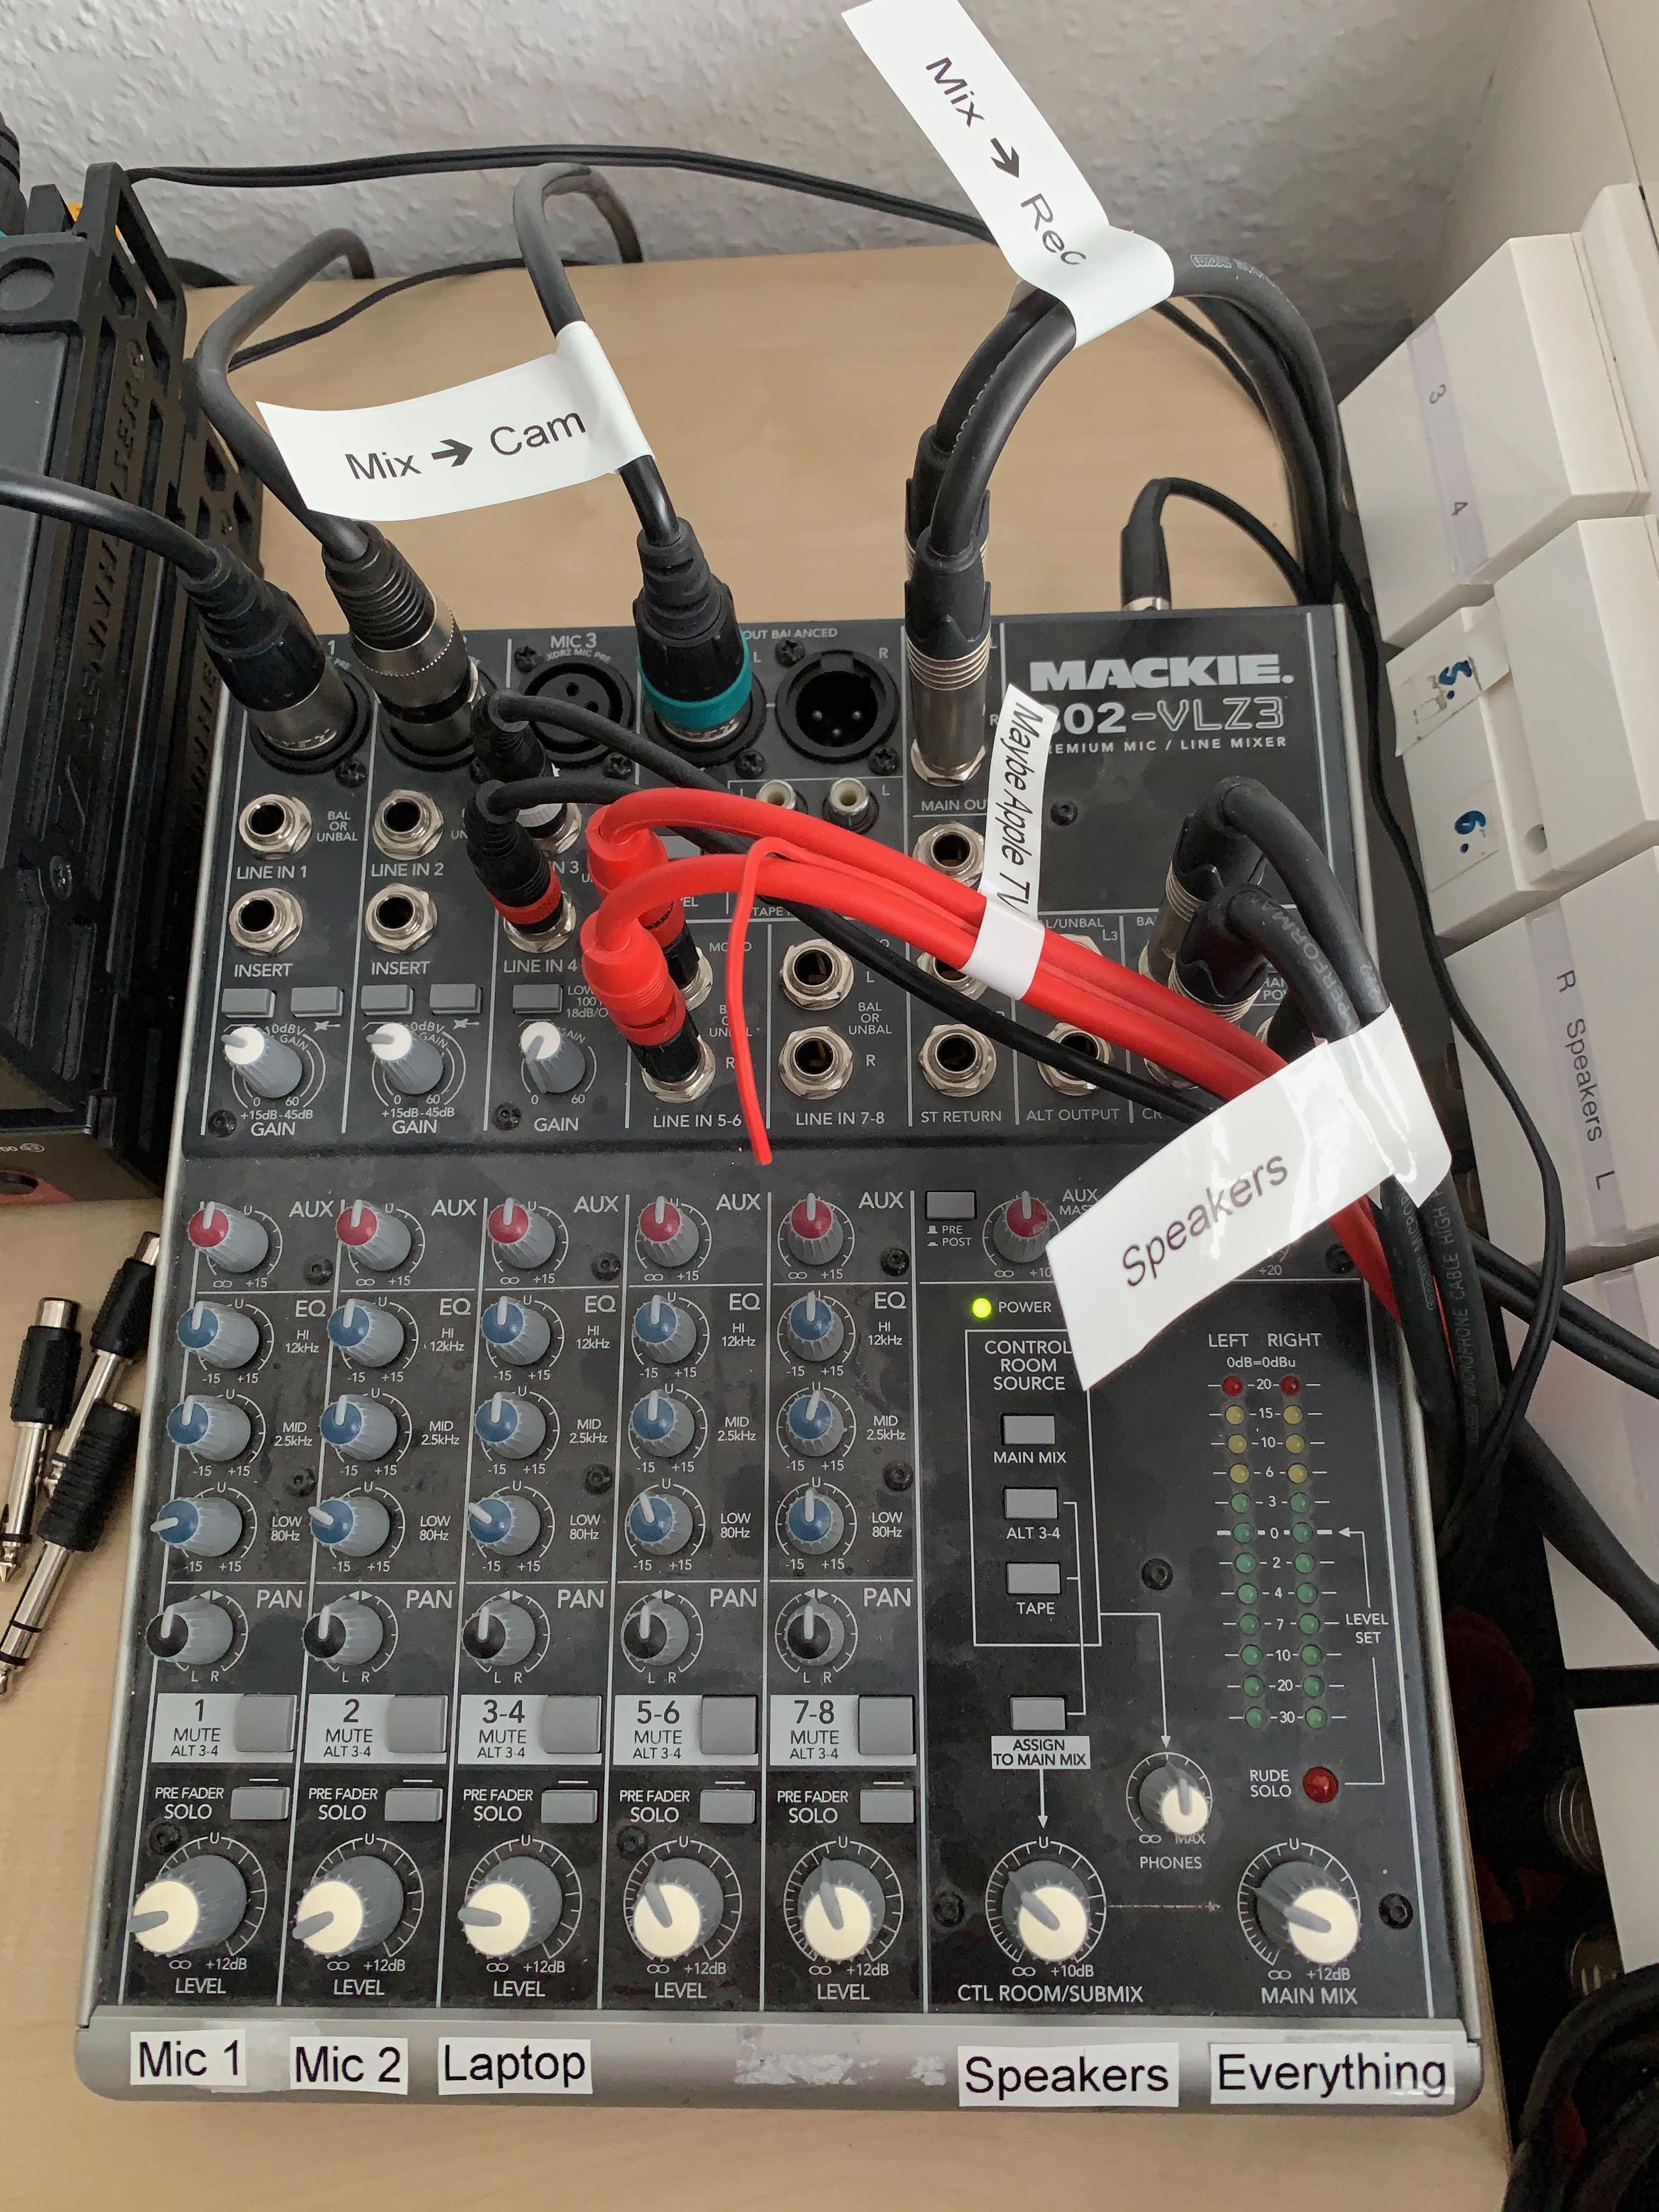
The mixing console in the seminar room receives audio from both wireless microphones, potentially the speaker's laptop, and some mytery red cables that are probably from the Apple TV. It outputs the mix to the loudspeakers, potentially the camera via XLR, and the HDMI recorder.

The two wireless microphones ("Mic 1" and "Mic 2") each have a receiver that sits to the side of the mixing console.
The audio from the speaker's laptop ("Laptop") comes from a dedicated cable that sits on the speaker's desk. If they need to play audio, tell them to plug that cable, labeled "Sound", into their laptop.
The loudspeakers need to be turned on with the switch near the window.
The mixing console sends the main mix to the camera via XLR ("Mix → Cam") and to the HDMI recorder ("Mix → Rec").
For controlling the volume, you have two knobs on the right. The main mix ("Everything") controls all outputs: The loudspeakers, as well as the camera and recorder feeds. The control room ("Speaker") affects the volume of the loudspeakers after the main mix; if the loudspeakers are too quiet, prefer to adjust only the "Speaker" knob. If you use the other knob, the volume on the HDMI recorder and camera might get too loud and clip.
HDMI Recorder
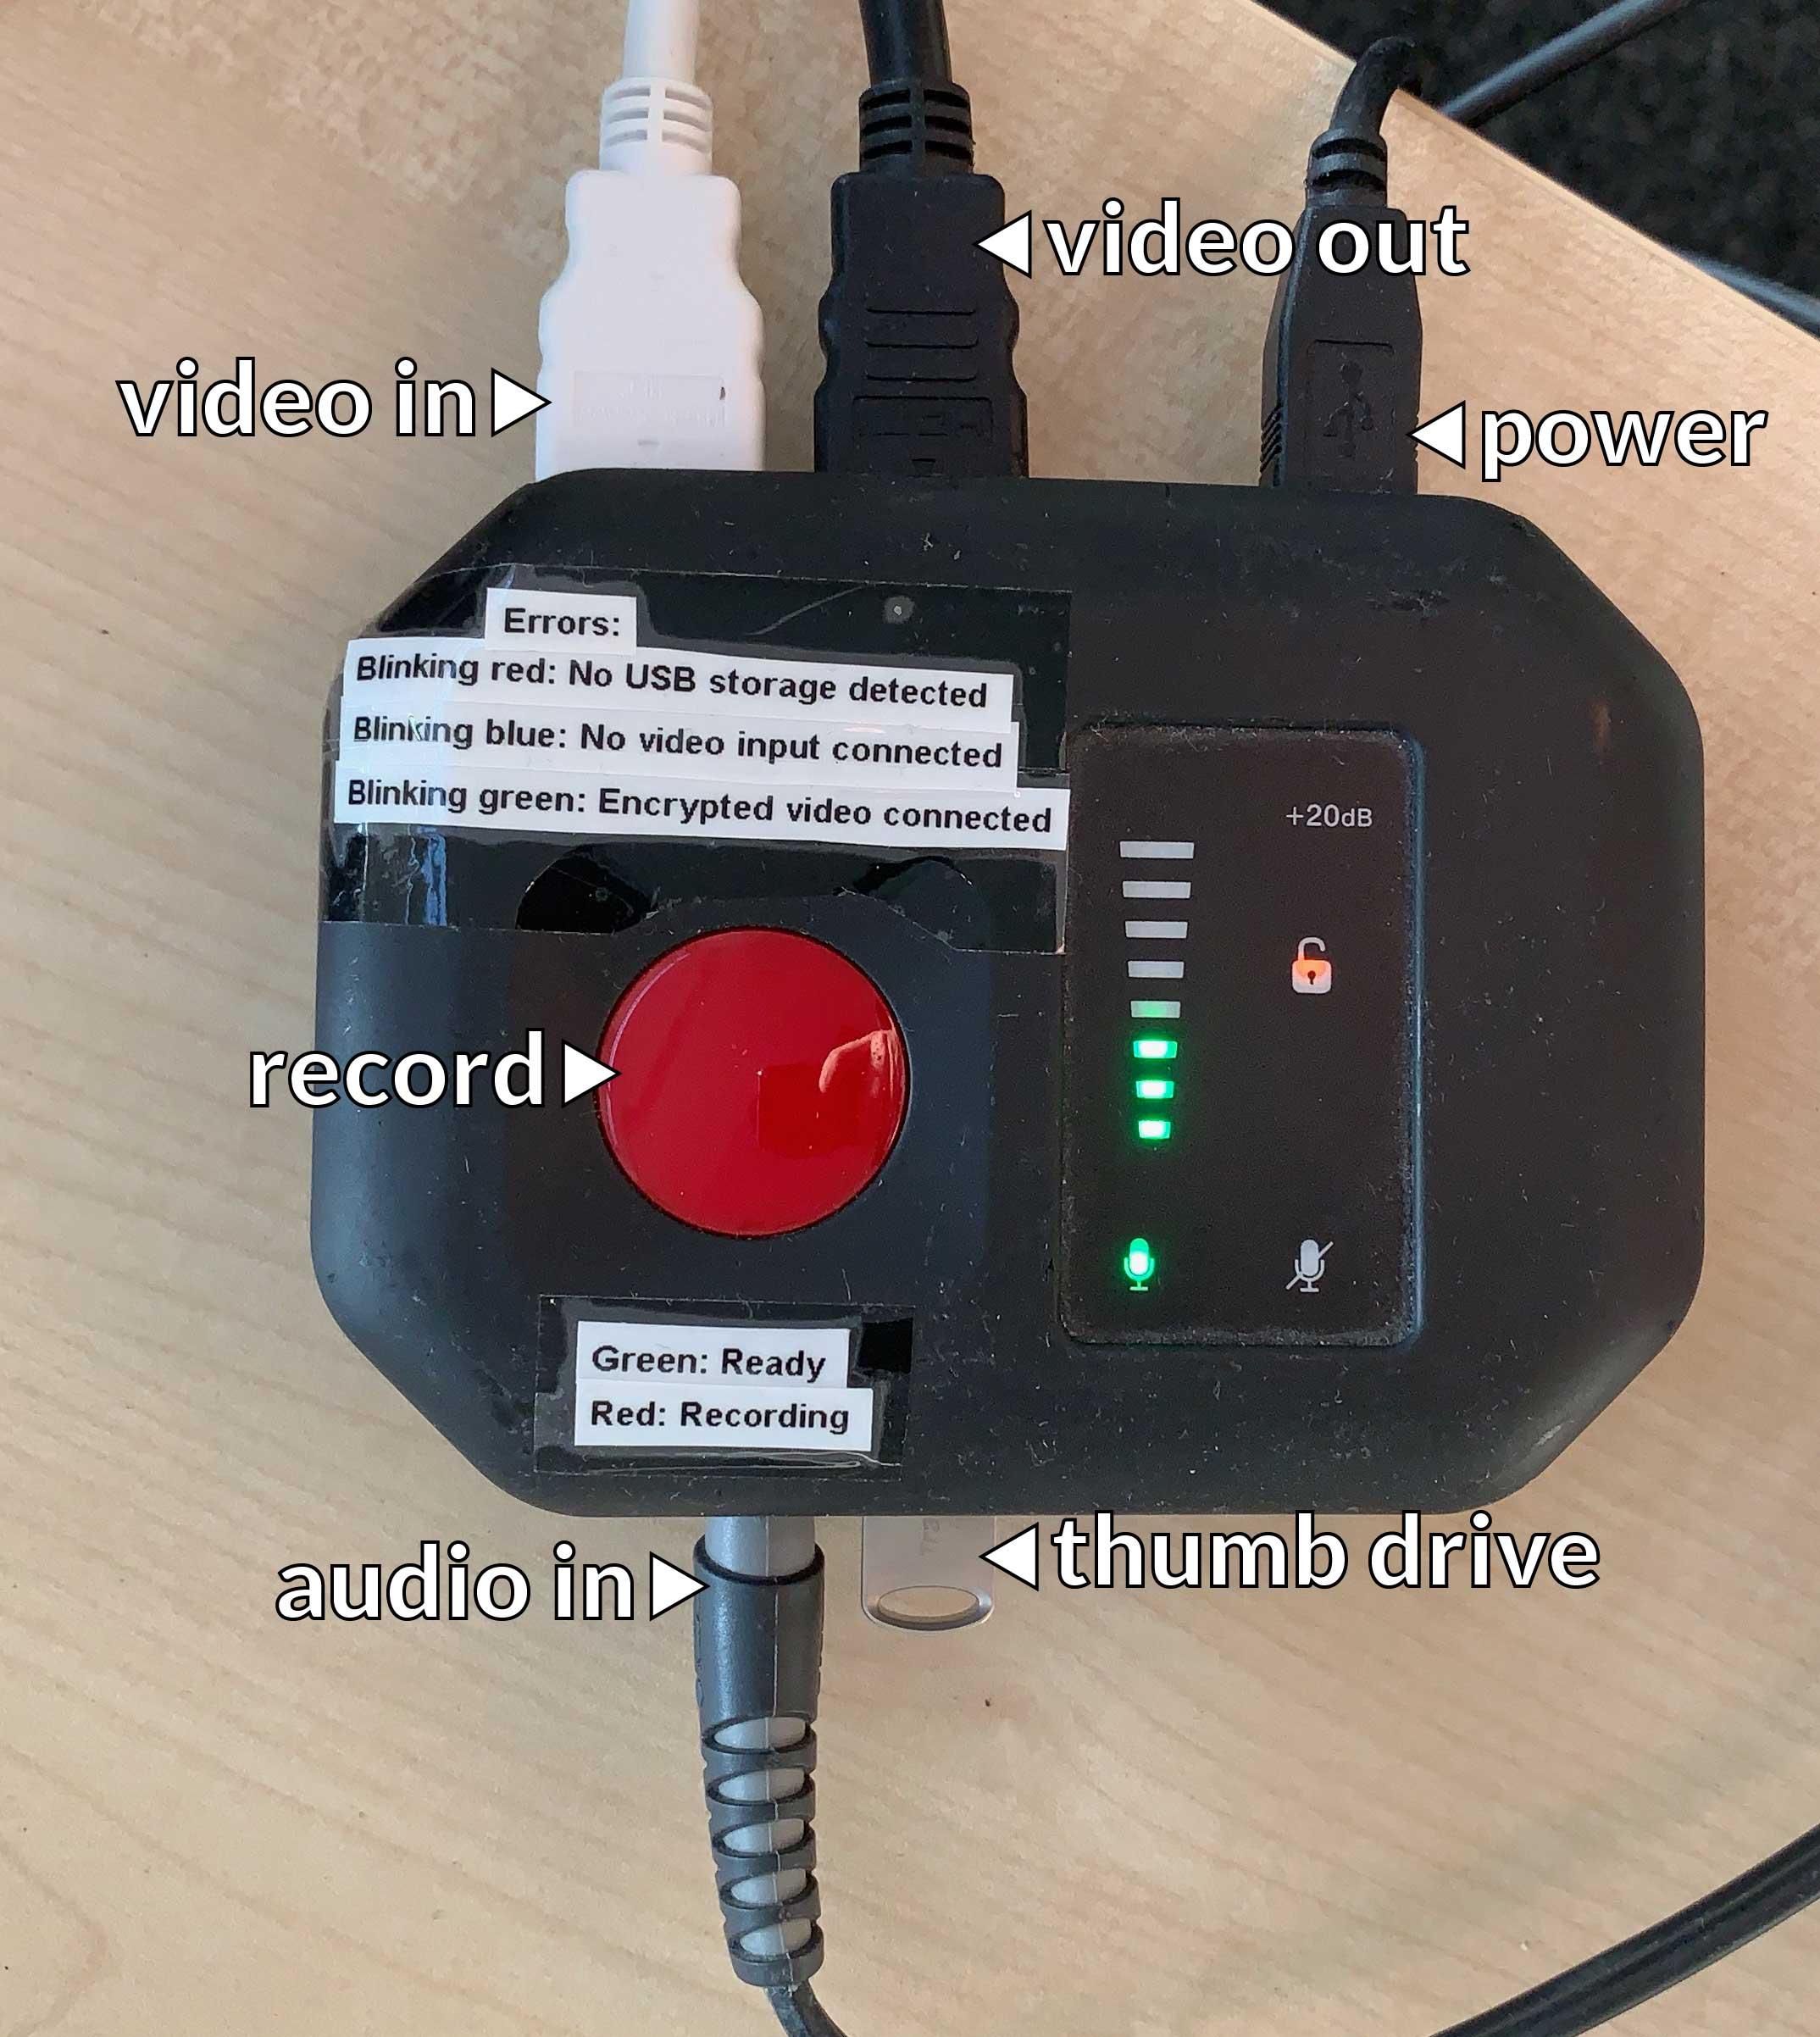
In the seminar room on the speaker's desk is a device that records the HDMI output and thus the projector's image. It captures both the picture from HDMI and the sound from the mixing console. It should always set up, ready to go.

Instructions are written on it. In principle you only need to press the big red button to start and stop the recording. It shines red when it is recording. For more information, consult the manual. ![]() HDMI-recorder-manual.pdf
HDMI-recorder-manual.pdf
It records to a small USB thumb drive. To copy the recordings, simply take that thumb drive and download the recordings. Delete all recordings you have copied from the thumb drive and put it back into the recorder.
In case you need to reset the device, you can reinstall its firmware. Installation instructions are in the zip-archive. ![]() HDMI-recorder-firmware-v3.1.1.35.43.zip You can also check the manufacturer's product page.
HDMI-recorder-firmware-v3.1.1.35.43.zip You can also check the manufacturer's product page.
Greenscreens
We have two different greenscreens. Their usage is documented on a dedicated greenscreen page.
Inventory
Audio Equipment
- 1 Zoom H1n digital audio recorder
- 1 Zoom H1 digital audio recorder
- 1 beige headset microphone (Sennheiser HSP 4 EW-3)
- 2 black wireless microphone belt-clip transmitters with clip-on lapel (lavalier) microphones (Sennheiser EW100-G3)
- 2 wireless microphone receivers (Sennheiser EW100-G3)
- 1 black USB audio interface (Steinberg UR22mkII)
- 1 black microphone table stand, fixed height (model: K&M 23230)
- 1 USB speakerphone (Smart Spider MT503 from Phoenix Audio Technologies)
- 1 black multi-pattern condensor microphone (audio-technica AT2050)
- 1 black condensor microphone stand mount (audio-technica)
- 1 black flexible pop-filter (K&M)
- 1 black height adjustable table stand
- 2 recording audio interfaces (M-AUDIO FireWire Solo)
- 1 silver MIDI converter (Roland TMC-6)
- 1 silver 4-channel stereo headphone amplifier (Behringer MicroAMP HA400)
- 1 silver MIDI keyboard (M-AUDIO Radium 49)
- 1 gray sound mixer (Behringer Xenyx 1622 FX)
- 1 gray sound mixer (Begringer Eurorack UB802)
- 2 gray monitor speakers (GENELEC 8020A)
- 1 black XLR to mini USB microphone interface (t.bone MicPlug USB)
Video Equipment
- 1 black video recording camera (Sony FS 5 II) with a Canon Zoom Lens (EF 24–70mm 1:2.8 L II USM)
- 1 black video recording camera (Canon XHA1)
- 1 black video RGB Light (GVM 800LED) with a black Bag
- 1 silver video recording camera (Canon MVX35i), in black bag in the admin office
- 1 black camera battery pack (Canon E160814)
- 1 black camera battery pack (Powery)
- 1 black camera carry bag (KATA)
- 1 black height adjustible tripod with a camera mount (Manfrotto 055XB)
- 1 black tripod carry bag (Manfrotto MBAG80P)
- 1 black height adjustible tripod
- 1 black height adjustible light stand
- 1 48cm ring light (Neewer)
- 1 photography umbrella (Walimex pro)
- 4 round green screens (Webaround)
- 1 square green screen (Elgato)
- 1 black portable screen capturing device (HD PVR Rocket)
- 1 black smartphone tripod mount (Zacro)
Still Photography Camera Equipment
- Canon EOS 40D digital camera (serial no. 0730547893)
- Canon Zoom Lens EF-S 17–55mm 1:2.8 IS USM
- Canon Macro Lens EF 100mm 1:2.8 USM
- Canon EOS Speedlite 580EX II flash (serial no. 128935)
- Canon Macro Twin Lite MT-24EX flash
The equipment is stored in a black camera bag in the admin office.
Lending Rules
If you want to lend equipment (directly, but also if you want to reserve equipment some days/weeks ahead), please write us a message in the #video channel on Slack with all necessary information (what, when, who, duration,...). For short lendings ("I need it now and only for today") write us an info message in the channel, too.

