Framer: A Personal Design Tool for 3D Picture Frames
A Bachelor Thesis by Verena Kuhr, supervised by René Bohne
Download thesis
You can download the PDF version of the thesis here.
Abstract
This proposal shows the idea and concept of my Bachelor Thesis. It presents different programs for 3D manipulation of objects at the computer using a mouse based on relevant literature. It also provides a general concept of my thesis, including the program I will design and the development based on a prototype and a user study for usability testing.
Introduction and Motivation
Objects with a lot of functions like digital cameras are a daily instrument, which makes thinks like storing a lot of photos simpler for us. Easy programs to edit the photos raise the quality of them and therefore people print out more photos which they want to show in their home and share with their friends.
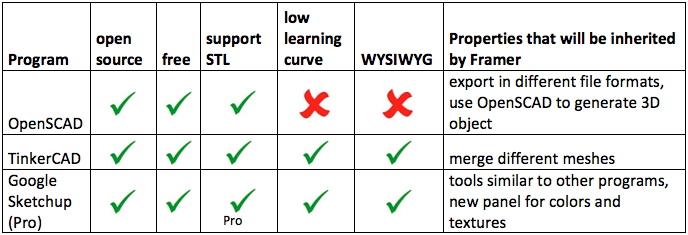
On the other hand there are new technologies. The quality of 3D printers get better and better and things can be built easier with this technique. One example is the ball bearing, which can be printed in one step without assembling. These constructs can be designed with programs like Blender, or Google Sketchup.
With programs like Blender, the user can design complex entities like motors in cars. However the program is very complex and therefore not easy to use for a non-professional.
Google Sketchup is easier to use, but does not have as many tools, to build more complex objects like it is possible with Blender. Another disadvantage is the number of steps, the user needs to perform with Sketchup to get a simple object. For example, to design a normal picture frame, Google Sketchup needs five steps. (Make rectangle, change size, make inner rectangle, cut it out, define the depth)
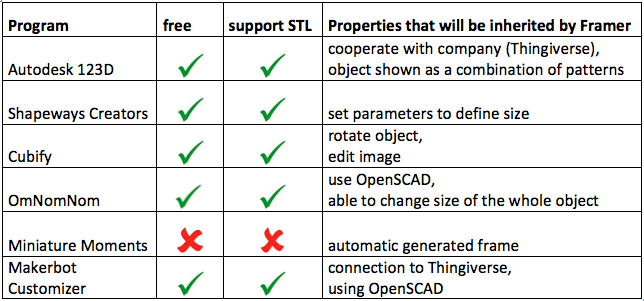
The main contribution will be the design and implementation of an easy and intuitive program that allows making an individual 3D picture frame for individual photos. In the last step it can be uploaded to the webpage Fabcenter and printed out with a 3D printer. Because of the latest updates of Makerbot ("Makerbot Customizer"), the program will also be connected with Thingiverse. The motivation and the necessity of this design tool will be determined by a survey and the usability will be evaluated in a paperprototype and a user study.
Research Questions:
- How to make personal fabrication more common in humans everyday life?
- Which new user group could be invented?
- How to motivate users to create 3D objects?
- How to simplify the possibility to print 3D objects?
Related Work
3D Object Library: Thingiverse Today, there exist a lot of communities, where people can upload their models and share them with other users, or get inspiration by others' work. The most popular one is Thingiverse. Since 2008, users can freely upload and share files that contain 3D models, so that everybody can benefit from them.
CAD Software: With CAD software, the user has the possibility to create new 3D objects.
Creator Software: With 3D object creator software, the user has a 3D object at the beginning, that can be edited and expanded with different shapes.
Interaction Technique
Most current Computer Aided Design (CAD) Systems still use two-dimensional input and output devices: a mouse for input and a screen for output. This will be my interaction design.
For more information see "Final Design".
Paperprototype
First, the design is tested with a paperprototype. The aim will be to find problems that occur when the user interact with the system.
Do they have problems…
… to load the wanted picture?
… to define the right size?
… to design the frame?
… with uploading the design?
Which false actions do they perform and why?
Screenshots:
Constellation of Paperprototype
Final Design
The changes because of the validation of the prototype and thoughts during the implementation process causes the final design.
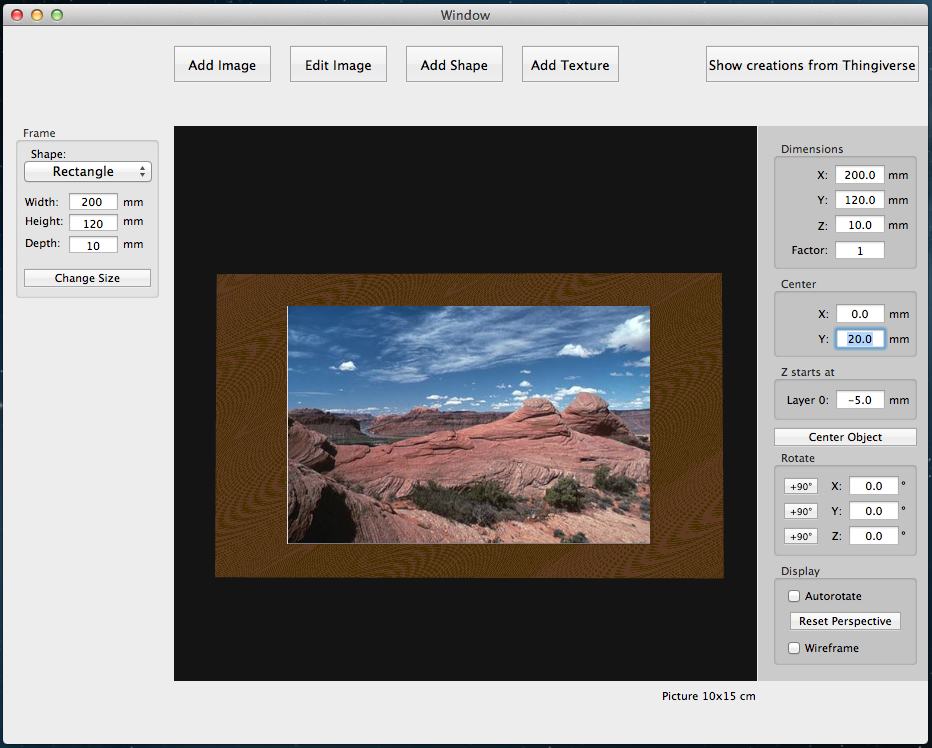
When the user adds a shape, he can define the size in the "Shapes" panel. There, the user can also define the position of the added shapes in the "Shape coordinate" box. The size of the frame in the main window can be defined in special ranges. The frame cannot be smaller than 100x150 mm which is the size of a picture. When the size of the frame or the coordinates of the added shapes are not in a special range, a warning message appears and the change is not fulfilled. With the texture panel, the frame can get different textures and colors. he OpenGL view can be changed by editing the dimensions and the center. The object can be cen- tered in the view with a button. This allows the user a de- tailed view of the frame. Beside the rotation by dragging the object with a mouse, the user can rotate the object by clicking +90◦ buttons or writing down a number. It helps the user to make more precise rotation. The object can also be autorotated and the composition of triangles of the STL file can be shown by clicking the checkbox "wireframe". So the user can see the constellation of his design. The user also has the opportunity to reset the perspective.
Usability Testing in User Study
I will test the usability of the design tool in a user study.
Additionally to video-recording their interaction with the program for closer inspection at a later date, they will have the chance to discuss their thoughts and actions.
The following methods will be used:
- Usability Inspection Method
- Formal action analysis method
- Usability Test Method
- Thinking aloud method
- Questionnaires
- Usability: SUS (System Usability Score)
- Creativity: CSI (Creativity Support Index)
- Adoption: NPS (Net-Promoter Score)
The formal action analysis method requires close inspection of the action sequences the user has to perform. The tasks will be divided into smaller subtasks to calculate the time of each step.
The thinking aloud method will be used after the method above. The method shows, why users do something. Preference and performance information can be collected simultaneously. At the end some questionnaires help to get a better overview of the user preferences.
Results
Time Participants needed 1.5 minutes in average to design a frame. Participants who already worked with the prototype are on average $31.84$ seconds faster then participants who worked with Framer for the first time. This faster processing time states the learnability of Framer.
Thinking aloud Will be added.
SUS SUS is 87.5%. The usability is in an acceptable range and Framer gets the grade B. This is a good result for Framer, which offers basic techniques.
CSI CSI is 82.15% for Framer. This creativity support afforded by Framer is already a good value at this point of time. Because of a high CSI, the time becomes distorted. Having the possibility to be creative leads to longer times and therefore the time to prepare a design becomes less important. To support more creativity, different additions can be done.
NPS NPS is 100%. This shows, that all participants would recommend Framer to a friend or colleague, when it is available or when it will appear on the market. This result is understandable because the survey stated, that the new usergroup is motivated to use and therefore also adopt Framer.
Future Work
Increase Creativity and Usability
- Draw a frame on a piece of paper and scan it with the laptop camera to edit this individual frame with Framer.