Roland UV Printer
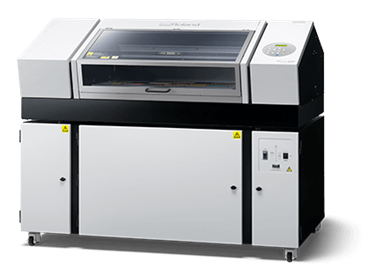
The Roland VersaUV LEF2-300 is a flatbed printer that uses UV-cured ink to print in photo-quality color on almost any surface. It joined our Fab Lab in 2020.
This printer is part of the special equipment that we operate as partners of the RWTH Excellence Startup Center.
Safety Notes - READ THIS!
- Open a window while you're in the room with the printer!
- Make sure that you turn on the ventilation system before printing as explained below! Turn it off after printing.
- Never turn the printer off at its main rear power switch. The printer does an automatic cleaning every day to keep the nozzles from getting clogged up.
- Wear gloves and safety glasses when a job was cancelled at the printer, or when cleaning the printer, to avoid touching uncured (liquid) ink. Normal operation does not require gloves!
If you have questions regarding safety issues, you can ask an employee at the lab.
Printing Tutorial
A tutorial for performing print jobs on the uv printer can be found here.
Ink Types and Materials to Print on
Print dimensions: 770 x 330 mm, max. object height: 102 mm
Ink types: Clear primer, Clear gloss, White, CMYK
Try printing without primer first. It's faster and cheaper. If the material breaks off your object when flexing it, use primer.
The primer is there to create a sticky foundation for the other ink types. It is not magic. If it doesn't work, try printing a glossy layer instead using a separate job before the main print. Marabu P2, P4 are good alternatives. The primer from FujiFilm Sericol works well for printing on carbon and leather. Glass and metal are usually too smooth, ask Roland for a mystery primer. :)
White is usually printed on top of the primer and beneath the main colors, to create good contrast on dark backgrounds.
VersaWorks now offers options to just use primer, white, or gloss in pixel graphics regions, for example.
Print Job Options
Media tab: Set size, mirroring, etc. if needed
Quality tab: See print time estimate here. Choose media type "Generic".
- "Generic distant" can print on curved surfaces but takes longer. Around 4 mm depth is the maximum.
- "Special Effects" kann mattes oder glossy Varnish erzeugen
- Plexiglass under-prints: print white over color, mirror image
- Bidirectional is a good default choice; unidirection takes twice as long but is a tiny bit better quality
Clipping tab: for prints larger than the printbed
Variable data tab: customize contents like in a serial letter
Special Color tab: Only if other than generic profile was chosen above. Select if white should be printed under everything or only under other colors. Can also reduce white size by 4 pixels to avoid flashes of white around colored objects.
Other tabs: ignore
Documentation
Get the latest manual from Roland's LEF2-300 product support page.
Additional Tips
We have an add-on bed for printing rotating objects. Mounting and unmounting it takes about 15 minutes.
The printer clogs up more easily when it gets hot. Stay within 19 and 30 degrees Celsius.
If the printer says CHECK WASTE BOTTLE, check to the right next to the printbed for the filling level.
Extra cartridge are stored beneath the printer. Cartridges last about half a year. Empty or expired print cartridges can be returned to Roland for free. Order replacements from the dealer, next-day shipping comes directly from Roland's Netherlands storage.
Remove White at least twice a week and shake.
Run MENU—Submenu—Maintenance—Cleaning—ENTER at least once a week. Cleaning takes 5 min. Checkout this video for information how to clean the printing heads during the cleaning process.
Open the left maintenance cover. Use the special Q-tips to clean around the print heads. Do NOT touch the underside of the print heads.
Open the right maintenance cover. Clean around the 'cup tops' and clean the wipers.
Confirm that you are finished, then a normal Cleaning is sufficient (no need for a head refresh).
Run a TEST PRINT: Before you can run a test print you need to define the printing dimensions. Otherwise the test print option will not appear on the printer display. To set up the printing area and run the test print follow the pages 142-148 in the maintenance manual of the printer. After the printing area is set you find the test print the following these functions: FUNCTION—CLEANING—TEST PRINT prints out a test print. The print is twice as high as the print head. If nozzles are stuck, run FUNCTION—CLEANING—.... . If that doesn't help, run FUNCTION—CLEANING—HEAD REFRESH for a more thorough head cleaning cycle. See the manual.
FUNCTION—TIMER to set regular on/off times
Print heads are group A (gloss and primer, cyan and magenta) and B (yellow, black, white, white).
Your Contacts
Contact Aron Heibges (starting April 2020), Anke Brocker if you have any questions about the printer.