User Centered Projection
The aim of user centered projection is to make the perspective of the rendered content dependant on the users position in front of the screen. So if the user moves his head, he sees the scene from different angles. The impression we want to achieve is that the screen becomes a window the user is looking into. One can imagine our 3D scene like a physical box mounted behind the monitor. If the content is rendered in an angle relative to the users position, the boundaries of the scene should appear to remain fixed.
To achieve this kind of illusion, we need to make the users as well as the physical screen part of our OpenGL coordinate system, then set up a virtual camera at the user's position. The information of user's position and the virtual camera's parameters is stored inside the OpenGL projection matrix and automatically applied to every object rendered in our scene, while we build our content in a nice karthesian box without having to worry about perspective.
In many cases this projection is calculated by using the OpenGL utilities function gluLookAt or similar functionality in DirectX. These functions however can only approximate the correct perspective we would need in an immersive Virtual Reality Environment. To cope for that we had to dig deeper and do the projection math ourselves.
The following two slides are taken from Thorsten Kuhlen's lecture on Virtual Reality and explain how we can build our projection matrix ourselves without even relying on the view transformation function glFrustrum. Six steps are necessary to build the projection matrix, each step comes down to a matrix multiplication. The pictures show what happens vith the actual view volume in the 2D-case each step.
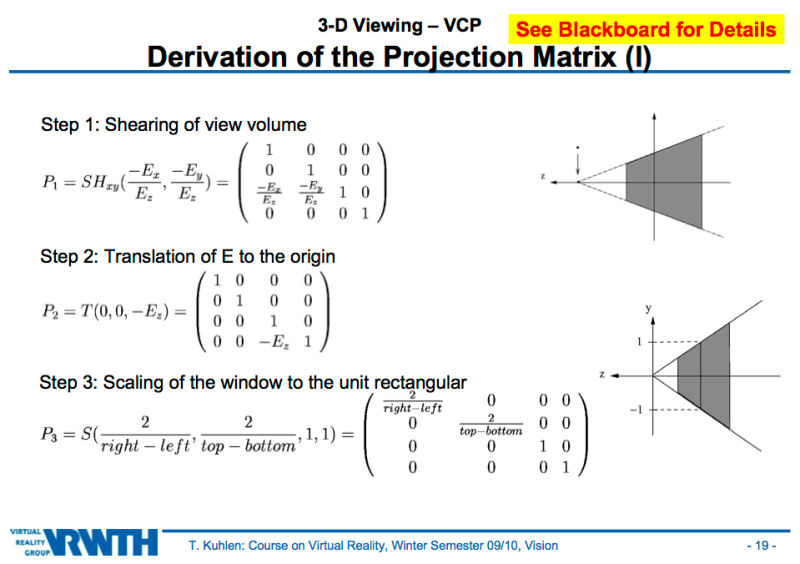
1. The shearing is the first step in making the projection user centered. In the picture the lone dot denotes the users eye position. In this step we are shearing the whole gl coordinate system to center its z-axis on the user. Although the image implies that the user is moved to the z-axis, in fact the opposite happens. This shearing bit is the most important part of the perspective correction and it is the part that is not offered by gluLookAt().
2. The gl scene is moved along its z-axis to center its origin it at the users position.
3. X/Y-scaling: this is normally done automatically by using glFrustrum() or glOrtho() commands. Since we are not using thouse, we have to take care of units ourselves and make sure, that in the end OpenGL only gets values between -1.0 and 1.0 in each direction. The right, left, top, and bottom variables denote the edges of the screen, meaning the physical screen borders position in the virtual coordinate system. In the end our gl scene gets mapped in a way, that the screen edges are precisely at -1.0 or 1.0 in X/Y respectively.
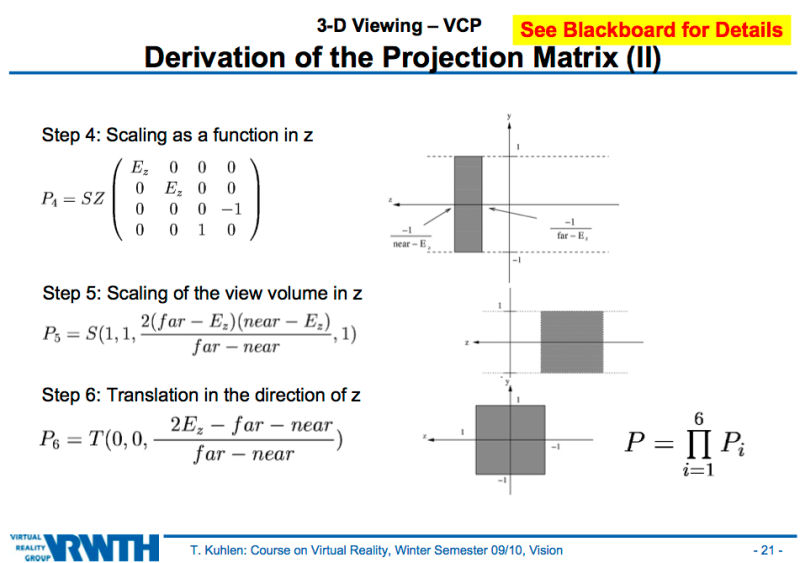
4. Z-scaling: In this step we are projecting the cone shaped real view volume of the user into a rectangular shape. This may be confusing now, but its true: By calculating the transformation that would be needed to transform the users real view volume into a box and saving it into a (no longer affine) matrix and then apllying this matrix onto a virtual object in a karthesian coordinate sysetm, we cause the virtual object to appear perspectively projected (eg. a box would be drawn smaller at the back end). Of course, the amount of correction applied here, depends on the users distance Ez from the screen. Therefore this transformation is a function of z.
5. Taking the near and far clipping plane into consideration, we stretch the view volume in z-direction. We want to achieve the same normalization with the z-axis as we did in step three with X and Y. This matrix basically de-compresses the view volume in z-direction. The compression factor has previously (step 4) been saved in the w-coordinate to avoid loosing accuracy, imagine a z-buffer range of 1000 being projected to a value between one and zero in single precision.
6. Now that the view volume is a perfect box with 2 units edge size, we just need to center it at the users position. All left to do for openGL now is a parrallel projection of this transformed view volume, to give a perspective impression of the virtual content.
Implementation
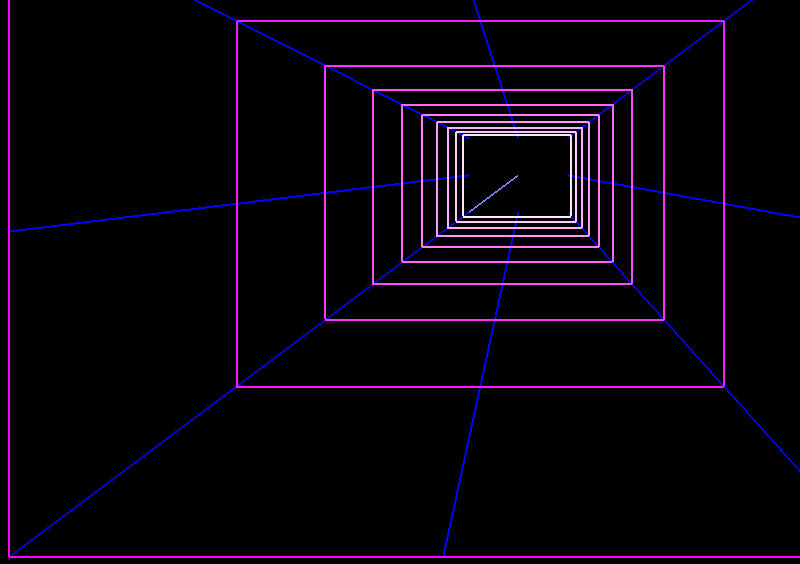
The following screenshot shows an implementation of this custom projection matrix, which is also available here: Projection Demo. The users position is not tracked yet. You can run the program and change the user position with the A,S,W,D and Q,E keys.