How to calibrate the magnet array
First of all, don't worry, you usually do not have to (and should not) change the calibration of the magnet array. Just import the calibration file from oliver after a clean system installation (see first section below).The modular and flexible nature of the Madgets table (and the fact that the wiring on our controller boards is somewhat arbitrary) makes it necessary to find an output index from 0 to 319 for each of the 228 magnets. Whenever the hardware configuration of the table changes, this mapping changes as well. Furthermore, some of the magnets are incorrectly manufactured and their polarization must be flipped. Simply spoken, the calibration answers the controller's question: "When I activate the magnet at (x,y), which output index do I have to trigger and do I have to flip the polarization?"
The application designer does not care about the calibration. Once the table is calibrated, this configuration is stored in the user's folder at
~/Library/Application Support/MagnetArray/MagnetArrayConfig.plist
All Madgets frameworks automatically load this configuration at start-up and use it for actuation.
The MagnetArrayControllerMac application provides the interface to setup the calibration.
You find it in the Software folder of the project's repository.

Import default calibration file
Normally, you just have to import the existing calibration file from oliver. Proceed as follows:- Start MagnetArrayControllerMac application.
- Choose menu item Calibration | Import.
- Open default calibration file from oliver:
afp://oliver/Public/Research Projects/Madgets/Configuration/Magnet Array Calibration/Default Magnet Array Calibration.plist - Close the application.
Change calibration (for experts only)
If you changed the setup of the table, e.g., the wiring between the controllers and the magnets, you have to calibrate the table. To reset the entire calibration beforehand, choose the menu item Calibration | Reset. Be aware that you lose all unsaved calibrations.To start calibration proceed as follows:
- Start MagnetArrayControllerMac application.
- Connect to the mbed controller #2. It is usually at 137.226.56.226 port 1234.
- Choose menu item Calibration | Start calibration.
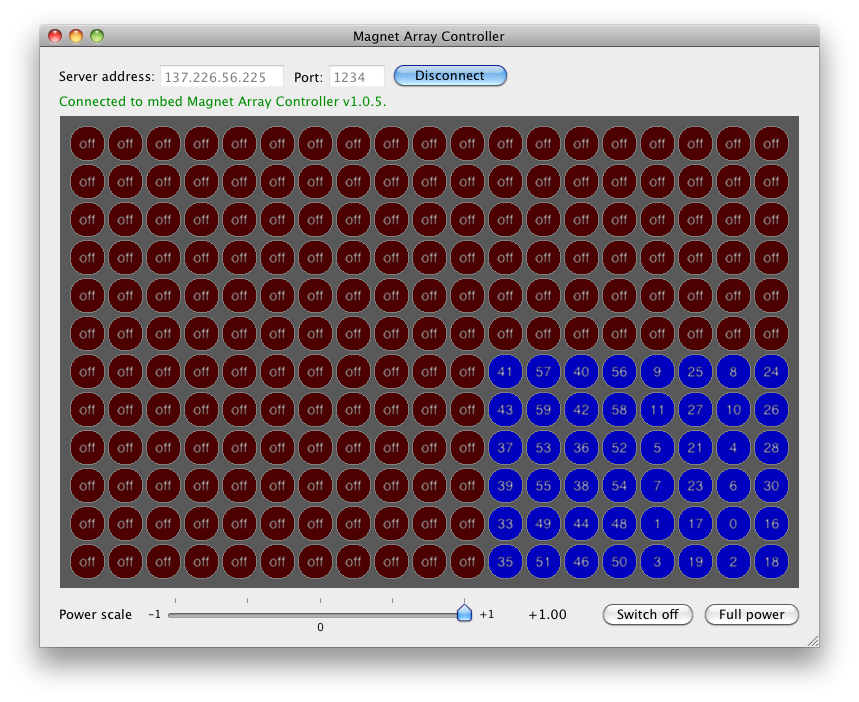 The circles reflect the current calibration state for each magnet:
- A red circle labeled with "off" denotes a disabled magnet which is not mapped to an output index. As long as no index is assigned to the magnet, it cannot be triggered. Rarely, the "off" state can also mean that a magnet is not operational.
- A blue circle indicates that the magnet is mapped to an output index. The index is shown in the center of the circle.
- Choose an output index from 0 to 319.
- Search for an activated magnet.
- If you found the magnet, click on the corresponding circle in the array, and assign the index.
- Proceed with the next index.
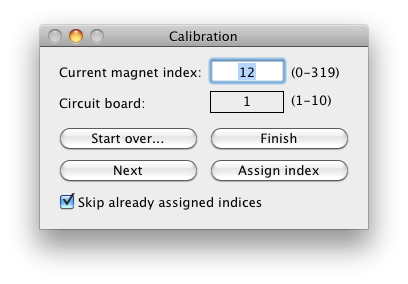 The window provides the UI which guides you through the entire calibration:
- The Current magnet index displays the index which is currently being tested. The application only activates this output index. In the case that no magnet is wired to this index, no magnet is activated. Otherwise, the particular magnet creates a magnetic field which the user can find by hovering a permanent magnet across all magnets. Please notice that you should drive the magnets at at least 15-20V to be able to feel the magnetic fields.
- When the user has found a magnet, she selects the corresponding circle in the array view and then pushes the Assign index button. Accordingly, the magnet is mapped to the current output index. The application then proceeds with the next index.
- The Start over button restarts the calibration and resets the magnet index.
- With the Next button the user can move to the next index. E.g., this is required if a distinct index does not enable any magnet.
- Finish ends the calibration mode and returns to the default magnet control mode. Alternatively, you can use the menu item Calibration | Stop calibration.
- If the checkbox Skip already assigned indices is checked, all already assigned indices are skipped. This is helpful, if you have already calibrated a part of the table and want to continue the process.
- If a magnet is activated, the total consumed current increases. Watch the current value shown on the power supply.
- Before searching for the magnet, select the menu item Calibration | Show magnet overlay or hit Command+O. The second screen, which should be the table's display, shows the magnet array on the table. The currently selected magnet is highlighted. You also see which magnets are already processed. If you have detected the magnet that is currently triggered, make sure that the selected magnet matches the position in the overlay before you assign the index. The overlay display requires the table's tracking to be calibrated in advance. You can close the overlay by choosing the menu item Calibration | Hide magnet overlay or hitting Command+O again.
Correct magnet polarization
If the polarization of a magnet is mixed up, you can simple flip it by doing the following:- Select the magnet.
- Right-click.
- Choose the menu item Flip polarization
To check the polarization of all magnets after all indices are assigned, put a permanent magnet over the top left magnet. Then, try to move this magnet by attracting it by adjacent magnets, until you have moved it across all magnets. If the magnet flips over, the polarization of the adjacent magnet is wrong and should be flipped.
Copy and paste calibration schemes
Calibrating the entire table is a lot of work. Therefore, the application supports a simple copy and paste feature that allows you to transfer a calibration scheme from one controller to another. Let's say you have calibrated the table for the first 32 indices, that is, for the first subarray controller. You can now select the block of magnets you have just calibrated, click right, and choose the Copy scheme item. Now select the adjacent block which is controlled by the next 32 indices. Click on its top left magnet, click right, and choose the Paste scheme item. Now enter the index offset between both controllers, in this case 32, and confirm. The index and polarization scheme are transfered to this new block. Of course, copy and paste only works within one module.Testing the calibration
You can test the calibration using the menu Hardware test | Successive magnet test. You can either choose On entire array to test all magnets, or On selected rectangle to test all magnets within the current rectangular selection of magnets. The test starts with the top left magnet in the table or in the selection, respectively. It then triggers all adjacent magnets line by line until all magnets have been activated once. Each magnet is activated for one second with +100 power.To test the table, put a permanent magnet in the top left corner, such that it does not flip over at +100. Then start the test. If the magnet has moved to the bottom right corner after the test, your calibration is correct. If the magnet flips over during the test, an electromagnet is probably incorrectly polarized. You can abort the test by clicking the Abort test button.
Further functions
There are further functions which help you in the calibration process:- If a magnet is mapped to a wrong index or if it is damaged, you can disable it. Select the magnet, right-click, and choose Disable.
- If the indices of two magnets are swapped, select both magnets, right-click, and choose Swap both indices.
- You can save the current calibration to a file by selecting the menu item Calibration | Export.