Arduino Prototyping Shields
There are several options for Arduino prototyping shields.
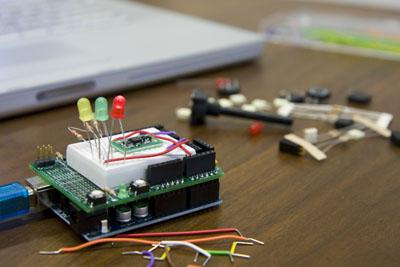
The SparkFun Arduino Prototyping Shield, available as a kit for $16.95 from SparkFun, stacks on top of the Arduino Diecimila and gives you a mini-breadboard and connections to all Arduino pins, as well as two extra LEDs, a reset button and a general-purpose pushbutton. It makes it much simpler to quickly attach sensors, ICs, LEDs, and accompanying other components like resistors to the Arduino for experimentation and prototyping, and lowers the danger of random cable disconnects.
However, after trying out both shields, I would rather recommend Adafruit's Arduino Prototyping Shield at this point. It doesn't have the quirks of SparkFun's design (described below), uses better-suited LEDs, and the kit is only $12.50. My board was a version 5. Again, don't forget to order a tiny breadboard for use with the kit.
Here's my Feb 2008 review of SparkFun's kit - it's also online at SparkFun's web site:
The extra pushbutton is wired directly to ground and via a 10k resistor to JC1 (NOT to Vcc). The link above to the old v1 schematic shows how it was supposed to work, with the 10k pullup connected directly to Vcc, and JC1 in the middle. SparkFun confirmed they'll address this too. Meanwhile, you can breadboard JC1 via another, much larger pullup resistor (such as 100k) to Vcc, then tap the voltage at JC1 using an alligator clip as output from the button - not perfect (with Vcc=5V, the button output will be around .5V when pushed and 4.5V when not), but it works.
The included red and yellow LEDs are also super-bright, but clear and extremely narrow-angle types. Kinda hard to see from the side, but look straight at 'em and you think you're frying your retina. Replace them with standard wide-angle 5mm LEDs, and use the diffused, colored type to make the light easier to see from the side, and to make them easier to tell apart when off (e.g., from RadioShack bag no. 276-1622).
I also soldered 3 small female headers (DigiKey no. S7035-ND, 2 pins is their minimum size, I cut one pin off each) into the jumper holes JC1-JC3 leading to the LEDs and switch, so you can stick the end of a cable, resistor, etc. into them when prototyping, just like with the breadboard. Much more practical than using header pins that always require an alligator clip or other contraption to connect to.
As for the ICSP connector, I believe you would need an all-in-one connector with six pins female below and six pins male above. That isn't in the bag, so I left those pins empty on the ProtoShield and just use the main Diecimila's connector.
A nice addition would be two small LEDs that duplicate the RX/TX LEDs on the main board - they help knowing how long a program upload is taking, without having to peek under the ProtoShield from the side.
Finally, the assembly instructions at the Atomic Salad website linked to from above are very nice, but refer to the earlier, first version of the ProtoShield kit. Some instructions don't apply anymore - just use common sense and look at your own board before each step to see if things have changed. In particular, make sure to cut your headers in lengths so they fit your own board. I also didn't need the cover tape, my v2 board leaves just enough space between the pushbutton and USB port.
Definitely get their mini-breadboard option for the kit - I actually got a packet of two even though I only ordered (and paid for) one.
In all, this shield is still a fantastic add-on that has greatly sped up my Arduino prototyping, despite some minor quirks, and I definitely recommend it. 4 out of 5 stars.
- jan (http://hci.rwth-aachen.de/borchers)