

3D Printers How To: General information for using our 3D printers
This will give you all the basic information you need to use one of our active 3D printers from BambuLab. For more detailed information on each 3D printer and its peculiarities, take a look at the page for that printer.
Read this if you are not working/writing your thesis/doing a practical course at the HCI chair
We offer access to our 3D printers to everybody in the context of our Open Lab Day. You can come by during the Open Lab Day with a USB stick with your 3d models (stl, obj, step, 3mf files are okay), or if you know a bit about slicers, you can also prepare your model in BambuStudio and bring the 3mf file of that. You can also contact us via email.
Since the 3D printers can be quite busy, 3D prints can take a while, and the printers are also used by the chair, the Fab Lab staff will deal with actually starting your prints during the week. We will try to get it done by next Tuesday, but we can't make any promises (especially if you send the mail on Monday evening ;) ). You will only pay the material cost, which BambuStudio will compute for us.
Check out Fab Lab Access to see how to contact us and for more information on the Open Lab Day. The other information on this page can still be interesting to you, so consider reading that as well!
The Process of Starting a 3D Print
- When is a printer free for you to use? There is no queueing system for our 3D printers. So generally, if a printer is free, you can use it.
However, please be a bit clever and mindful of your peers. Ask around among the people in the lab, if nobody else needs it more urgently. Also, if you have long prints, try to schedule them overnight so the printer can still be used during the day for smaller jobs. If you are not there in the evening, ask people in the lab, if anybody who stays late can start your print for you before they leave. Communicate!
Different parties use the printers, and they have different priorities. If there is an unresolvable conflict, the priority order from most to least important is: Research prints (PhD Students & Student assistants) > Thesis students > Practical lab students > private projects & jobs the Fab Lab staff prints for the Open Lab Day. - Slicer. You have your 3D model (stl, obj, step, 3mf file) and want to print it. How? To prepare the model for printing, it needs to be sliced. That means it is cut into very thin layers, which the 3D printer will add one after the other. All instructions that the 3D printer needs are generated in this process. The software to do this with is called a slicer. Since we only use BambuLab printers, we use their slicer, BambuStudio.
In the Fab Lab, next to the 3D printers, we have a computer with the sole purpose of providing BambuStudio to you. You can bring your 3D models on a USB stick or use Oliver (the network file server), which is connected to the computer. You can also download BambuStudio on your own machine, make all the settings, save the project (3mf file), and take that file to the computer in the Fab Lab. Then, you only need to open it and hit print.
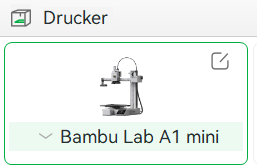
If you are working at the chair and will use the printers very frequently, talk to your supervisor or Fab Lab staff. We may then provide you with our BambuStudio login credentials so you can start prints on your machine and monitor them remotely. - Printer Choice. If you open BambuStudio and import your model, the first setting in the top left is which printer to use. In general, use the smallest printer possible. A1Mini is not enclosed. H2D can print with two materials/colors at the same time, way more efficiently.
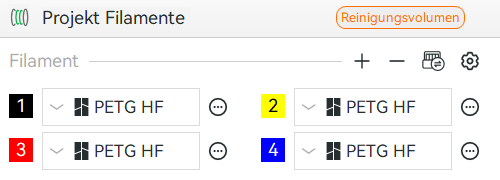
- Material Choice. Take a look at the section below about types of filament and select the one most fitting to you. Choose a color at the lab. Don't hesitate to open a cardboard box if needed. If you do so, cut off the first 2cm of filament (where the tape is attached). In BambuStudio, on the left side, you can add/remove filaments to the file. Select the type and color. You can assign different colors to different objects.
- (Un-)loading Filament. All printers have one or more AMS (Automated Material System) attached. You simply put the filament spools in there, and the attached printer will load them as soon as the print is started. Take a look at the individual printer pages for the exact AMS configuration. If in doubt how to load spools into the AMS, take a look at Step 2 from this BambuLab tutorial (A1Mini AMS is only slightly different). If no space is left in any, you can remove a spool by just pulling it out. Hold onto the end of the filament and pull it through the hole in the side of the spool, then put it onto the shelf.
If a spool doesn't have enough material left for your print, you can add another spool of the same filament in the same or another AMS. Please select the nearly empty spool when starting the print (see below). It will be used as long as possible, and the printer will automatically switch to the other spool. - Settings. On the left side, you can change many settings. If you don't know anything about them, leave the default values. Below, you can find some tips and tricks on settings that may interest you. The three most important ones are listed here.
- Nozzle Diameter. In BambuStudio, this setting is directly below the printer choice. We have 0.2 and 0.4 mm nozzles. 0.4 is the default. Only use a 0.2 Nozzle if your print has tiny details that a 0.4 nozzle can't print. Check individual printer pages for information on which nozzles are available and how to change them.
- Layer Height. How high each slice is. 0.2mm is the default. In BambuStudio, this setting is around the middle on the left side in the form of a big drop-down. Changing this will change all settings below it.
- Support. If your model has overhangs, you will need support structures that can be broken off afterward. The slicer will warn you if you have this disabled, but it thinks this is needed. This recommendation doesn't work perfectly. "Tree support" "on build plate only" is a setting combination fitting for 98% of cases where support is needed.
- Slicing. In the top right, you can "slice plate". After a few seconds, you get a preview of what your model looks like. If it is a private print, you can also see the price here.
- Starting the print. Hit "print" in the top right. Select the correct printer. Check if the filament is selected correctly. AMS systems have letters assigned to them. Spool B3, for example, means the third spool in AMS B. Name your job <your name>_<description>, e.g., Julian_PyBadge-Case, so failures can be traced. Leave all calibrations turned on, only timelapse turned off. Hit "print". Enjoy!
Types of Filament Available
We don't maintain a list of all materials and colors we currently have because the inventory can change so quickly. Here you can find a list of the materials we usually have in stock, with some (very simplified!) remarks on use cases. We print with BambuLab filaments only (99%). Check out BambuLabs filament guide for detailed information. All filament spools are labeled with their type. They also have RFID tags, so as soon as you put them into an AMS, the printer knows their type. Please note that not all printers can print all filaments. Check the individual printer pages for possible restrictions.
- PLA. By far the most common material. Totally sufficient for most print cases, especially for decorative elements. It is pretty hard (thus breaking more quickly than other materials), softens at around 55°C, and doesn't like prolonged contact with water. There are a few different subtypes of PLA that we have, which mostly differ in appearance. PLA-CF has very important differences.
- PLA Basic. What BambuLab calls their normal PLA. Usually, a pretty glossy finish.
- PLA Matte. Behaves exactly like PLA Basic. Matte finish.
- PLA Silk. Even more shiny than PLA Matte. We found that it does not seem to connect well with other PLA filaments, so keep that in mind for multicolor prints.
- PLA Marble. Behaves like normal PLA. Just has these marble-like color pieces in there. Layer Lines become less visible.
- PLA Galaxy. Behaves like normal PLA. Very shiny.
- PLA Wood. Has actual wood dust in there. Draws moisture. We are not very happy with how it looks. Settings may be adjusted to make it look good.
- PLA-CF. Has small carbon fibers in there. Needs a hardened nozzle, so some printers can't print it. Also, it can't be used with the 0.2 Nozzle. Some claims that it is more stable were made, but whether it actually is remains doubtful. The available colors, however, are very cool and have some texture.
- PLA Conductive. Ordered for the HdM project. Needs to be loaded externally due to the cardboard spool. From Protopasta, as BambuLab doesn't offer it. Only for internal use.
- PETG. The other big material. More water-resistant, softening at around 65°C, so it is your basic choice for more demanding prints. Also, it is a bit softer than PLA (you won't feel it, but it is), so it doesn't break as quickly.
- PETG HF vs. PETG Basic. In 2026, BambuLab switched its whole PETG production line from PETG HF to PETG Basic. Similar printing quality, colors... You might encounter both in stock until we use up all the PETG HF spools. Just make sure you have the correct type selected when you slice.
- PETG Translucent. Will let some light through, but is not see-trough. Look at BambuLabs tutorial for translucent filament, as printing settings have to be heavily modified to get a good result. Be careful with overhangs and infill patterns.
- TPU. A soft, rubber-like material. Good for seals. Very good adhesion between layer lines. As TPU draws moisture out of the air until it can't be printed anymore, it is stored in a sealed box. Please put it back into the box immediately after you use it. If possible, don't make overnight prints with it. Consider looking at BambuLabs documentation for TPU. We have two different types:
- TPU for AMS. Not super flexible, but still much more than any other material. Can be used just like any other filament in the AMS (hence the name)
- TPU 85A. (or any other number + letter combination) Very soft. So soft that the AMS can't push it to the printer. Don't use it in AMS! Needs to be loaded externally. See the individual printer's page to see how that is done.
- PC. Polycarbonate. Pretty much as sturdy as filaments at our lab go. Very temperature resistant. Needs an enclosed printer. Draws moisture from the air, so it needs to be stored in a sealed box (or a sealed AMS). Needs glue on the print bed. Smooth surfaces. Only use it when you really need it!
- PA-GF, PA6-CF, PAHT. Nylon, possibly with glas fiber (GF), or with carbon fiber (CF). Also super sturdy and heat-resistant. Draws moisture from the air, so it needs to be stored in a sealed box (or a sealed AMS). Needs glue on the print bed. Rougher surfaces. Only use it when you really need it!
Some Settings Tips and Tricks
- Prints Not Sticking to the Build Plate?
- Clean the build plate thoroughly, following the tutorial over the sink in the Lab
- Ensure there is no grease residue from handling the plate—any grease will prevent the plastic from sticking
- BambuStudio has the setting brim, which allows you to increase the touching area between the print and the print bed
- How to Increase Part Strength?
- Increase the number of wall loops
- If needed, increase infill density and change the infill pattern (gyroid is a good choice for strength in all directions)
- You have round objects & the layer lines are visible?
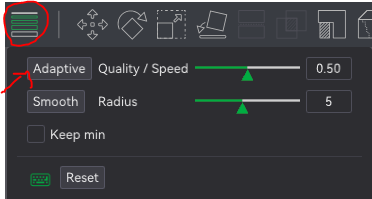
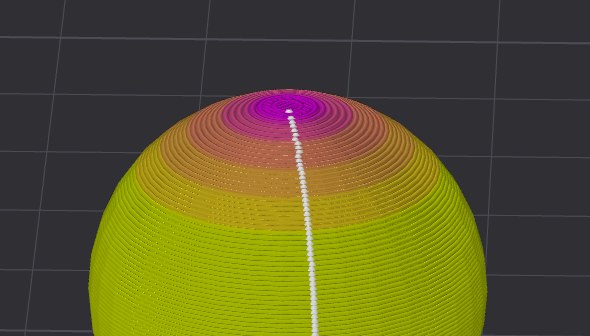
- Adaptive Layer Height automatically adjusts layer thickness where needed. This gives high surface quality while being faster than printing the entire part with a fine layer height.
- What to Do with Very Thin or Small Details?
- If possible, use a 0.20 mm nozzle setup
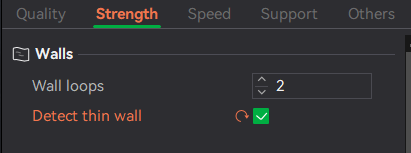
- Enable Thin Wall Detection
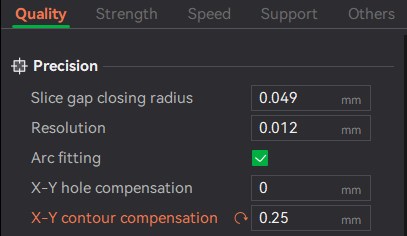
- If details are still unprintable, increase Contour Compensation (e.g., +0.25 mm ensures a minimum feature thickness of 0.50 mm)
- Optionally, enable the Arachne Wall Generator to print features smaller than the installed nozzle diameter by reducing flow on thinner sections.
- Don't like the texture of the print bed?
- Use the smooth plate. For each printer, we have one plate with a smooth surface on one side. The smooth plate needs to be selected in the top left of the slicer
- Always clean the plate before printing with PLA.
- Before printing PETG on the smooth PEI plate, rub the surface lightly with your hands. The natural skin oils help prevent the PETG from sticking too strongly, making it easier to remove the print.
- Only use if really needed!
Maintanance
- Lubricate the Rails: The printer will periodically prompt you to apply lubricant to the linear rails.
- Clean Build Plates: Regularly wipe down plates with IPA to remove dust and oils.
- Remove Stuck Filament: If filament is stuck on the nozzle, heat to 180 °C and carefully remove the blob.
- Clear the Poop Chute: Empty and clean the debris collector (often called the poop chute) to prevent jams.