Vicon Guide


Welcome to the guide for the Vicon Motion Tracking System. This page provides in-depth details about the features of the system, step-by-step instructions to configure it, and other useful guidelines to help you get started with tracking your objects! (Click on images to view full-size versions.)
For external users: If you are interested in borrowing the Vicon system for your research, please take a look at this page.
Keywords
For external users: If you are interested in borrowing the Vicon system for your research, please take a look at this page.
Getting Started
We have a complete Vicon Kit which consists of all necessary hardware (cameras, calibration kit, markers, etc.) as well as a subscription for the Vicon Tracker software. This section will help you get started with setting up the system.
To arrange the hardware, you have two possible options:
If you want to run the Vicon Tracker on your Mac, you can do so by running a Windows XP Virtual Machine with Parallels. To do so, follow these steps:
Using this method, you can simultaneously run both, the Vicon Tracker (on Parallels) and your Vicon Client App (on Mac OS X), on the same machine.
Check the price list if you need to order more markers.
See this video tutorial for how to use Vicon Nexus.
This section contains information with respect to:
You have to do this once, unless the cameras are moved. For user studies, we recommend fixing the cameras in place and calibrate only once because the differences in calibrations may make your error fluctuates.
This sections describes creation of objects using a set of markers.
To create an object you need at least three markers.
Only objects that are selected in the 'Objects' view are streamed to the network and can thus be tracked by other applications as well. This means that position of a marker that is not associated to an object will not be streamed to the network.
Note: The ViconDataStream Framework offers SOME support for tracking individual markers. You can get more information about this here. However, note that marker–label association order is not guaranteed to be accurate.
If you select more than one marker, a virtual marker appears that you can snap to as well, e.g., to set the origin of an object exactly between two markers.
You can change an names of objects' markers after clicking on the triangle for more details right of the object to show you its details.
There you can also select and deselect certain markers if this is hard to do in the 3d-perspective (e.g., if they are covered by other markers or objects)
Developing apps which include data from Vicon.
The Vicon streams information about all selected objects in the Tracker. The actual data reported is with respect to the center of the defined object, represented by a polygon. It is possible to manually change this center of these objects (see Advanced Modelling).
Note: While using i10 client apps like SimpleViconGLClient, iOSViconApp, and SimpleViconApp, the name might be appended with a whitespace at the end.
Be aware that the rotation information sent from the Vicon corresponds to the rotation in radian angle-axis.
Consider an object that is rotated with respect to the blue axis:
The reported value for the green and red axes wont change, and the reported value for the blue axis will change by pi/6 radians.
Note:After cloning the repository, please delete the .git folder
This cocoa framework makes streaming Vicon data to your application easy as pye. :) Check the guide page for more information
An easy-to-use app which can initiate connections with the Vicon; displays the received objects and their positions.
The client uses Modern Objective-C with ARC (Automatic Reference Counting).
The iOS version of the SimpleViconApp. Connect to the Vicon with your iPhone/iPad (via WiFi).
This client is more complex, and a bit harder to grasp. It uses OpenGL to display the 3D positions of markers and objects on screen.
Does not use ARC; no automatic memory management!
Follow the Guide linked here
Known issues and FAQs.
Refer to the section titled "Installing the Windows XP Virtual Machine on Mac OS X" for more information on how to do this.
Philipp WackerThis email address is being protected from spambots. You need JavaScript enabled to view it. Anke BrockerThis email address is being protected from spambots. You need JavaScript enabled to view it.
hci.rwth-aachen.de/guide_vicon_old
To arrange the hardware, you have two possible options:
- Use the pre-configured set-up in the Project Space, at i10 (less complicated).
- Create your own custom hardware set-up (customisable; more work).
Network Configuration
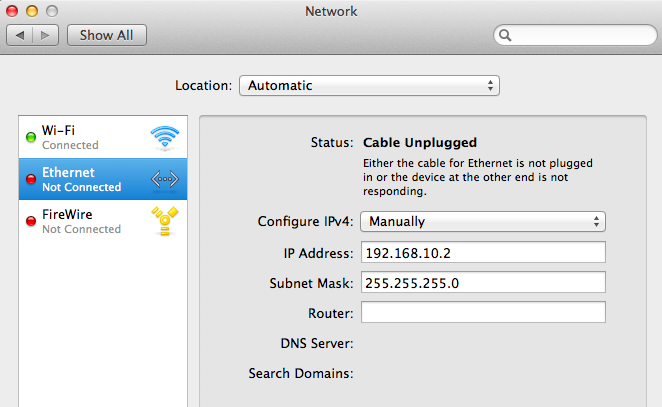 |
Both, the MacBook Pro (running the Vicon Tracker), and the client machine should have the following network configuration: Static IP Address: 192.168.10.x (where, 0<x<255) Subnet Mask: 255.255.255.0 Make sure that these IP addresses on different machines are unique. To connect with an iPhone/iPad, the Vicon system and the device should be in the same network. Configure the Wi-Fi network to match the above settings. |
Installing the Windows XP Virtual Machine on Mac OS X
If you want to run the Vicon Tracker on your Mac, you can do so by running a Windows XP Virtual Machine with Parallels. To do so, follow these steps:
- Install Parallels on your machine. You can run the trial version for two weeks.
- A copy of the Vicon Windows XP Virtual Machine is available at oliver/Public/Software/Motion Tracking Disk Images/Vicon Windows XP VM.pvm. Copy this onto your local hard drive.
- Run the Virtual Machine by double-clicking on the .pvm file. This will automatically open the Parallels App and launch the Windows XP VM.
- The next time you start the Parallels app, Windows XP should appear in the list of virtual machines. You can directly run it from here in the future.
Using this method, you can simultaneously run both, the Vicon Tracker (on Parallels) and your Vicon Client App (on Mac OS X), on the same machine.
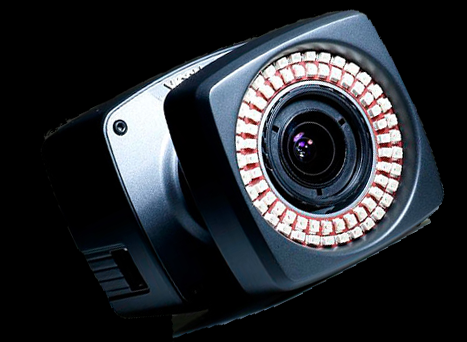
Hardware Available
- Eight Vicon Bonita Cameras
- CAT.6 LAN cables (we have some extremely long ones available)
- Two Trendnet 8-Port Giganet switches (PoE-enabled to provide power to the cameras)
- 5-Marker Vicon Calibration Wand
- Reflective markers of various sizes
- Tripods and camera mounts
- Screws: Vicon cameras are mounted with UNC-16 3/8" x 2" screws.
- Dealer: Jan Heuten; Heuten Autoersatzteile GmbH; Gleueler Str. 64; 50226 Frechen; Tel : 02234-2029190
- Order Details: Schraube UNC 3/8" x 2", 10er Pack, SH506161 4001 (6,39 Euro per 10 Stück)
Vicon marker inventory
| Type | Big with connection-thread | Big | Big with black base | Medium | Medium with black base | Small | Tiny | Reflective Tape |
|---|---|---|---|---|---|---|---|---|
| Overall | 2 | 4 | 50 | 4 | 50 | 38 | 20 | 20 |
| Wolfgang Thiele | 1 | 1 | 1 | 1 | ||||
| Chat: Tremor | 11 | |||||||
| Chat: FingerFlux | 20 |
Vicon Nexus License USB Stick
We have two licenses for Vicon Nexus. One is in the Project Space, another is in Chat's Support drawer.Check the price list if you need to order more markers.
Cleanup after use
This section describes any steps you should perform after usage of the Vicon to leave the system in a known state for usage by others.- Exit the Vicon Tracker 1.10 Application.
- Shutdown the Macbook Pro as normally.
- Unplug the electric extension socket (only if any external switches used).
- Put the lense caps back onto the camera lenses (only if used outside i10).
- Put all things taken from the suitcase calibration kit neatly back into the suitcase.
Nexus UI
Tracker UI
Mouse Controls
- Click and drag with left mouse button to rotate
- Click and drag with right mouse button to zoom
- Drag with both mouse buttons to pan
Keyboard Controls
- Hold down Ctrl-key to select multiple objects—this includes cameras in the list view, markers in the 3D view, etc.
- Press the Spacebar to PAUSE the camera stream. This freezes the markers, and allows for easier modelling of objects.
Calibration
- Organizing and adjusting the cameras.
- Creating calibration masks.
- Calibrating cameras.
- Setting origin.
You have to do this once, unless the cameras are moved. For user studies, we recommend fixing the cameras in place and calibrate only once because the differences in calibrations may make your error fluctuates.
Starting the Tracker Application
|
|||
 |
Organizing the Cameras
|
||
 |
Viewing the Orientation of the Cameras
|
||
 |
Changing the Camera Order |
||
 Left: Bad blob; Right: Good blob Left: Bad blob; Right: Good blob |
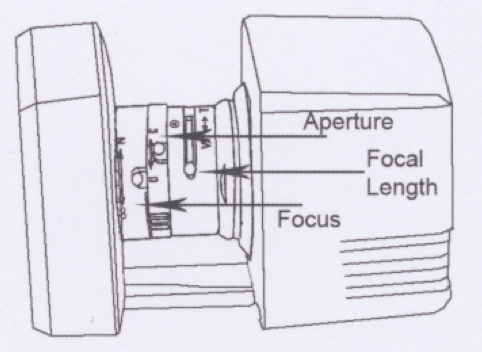
Adjusting cameras
|
||
|
Creating Background MasksFrom this step, we will use tools from CALIBRATE tab.
|
||
  |
Calibrating
HINT: If the calibration is bad while all images looks fine and tracks are properly generated, try restarting the Vicon Tracker program. (It helps because you are in Windows XP. :D) If calibration is still not accurate, or one of the cameras refuses to get calibrated, press 'Reset' under 'Manage Camera Calibration'. Setting volume origin
If the set origin button does not work, see this secion. |


Modelling Objects
- What you can/cannot track
- Creating objects
- Advanced modelling
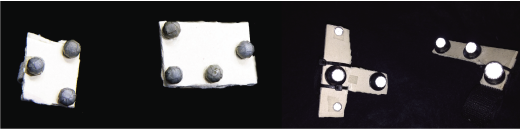 |
You can create objects using the various reflective markers available. In general, since bigger markers reflect more infrared light, they are easier to track by the cameras, and hence more robust; smaller markers have the advantage of being more accurate. A few sample objects that work well with the Vicon are shown in the adjacent figure. Note that you can make them wearable (for instance, on fingers) by attaching velcro strips or elastic bands to the base. |
What you can't model/ Things that don't work
Tracking individual markers
Although you can see individual markers in the 3D View of Tracker, which do not belong to an object you defined, you cannot create an object with just one marker. This is probably because the Tracker software cannot differentiate various markers from each other. Thus you see two markers, but if you hide them and then show them again the software does not know which one is which.To create an object you need at least three markers.
Only objects that are selected in the 'Objects' view are streamed to the network and can thus be tracked by other applications as well. This means that position of a marker that is not associated to an object will not be streamed to the network.
Note: The ViconDataStream Framework offers SOME support for tracking individual markers. You can get more information about this here. However, note that marker–label association order is not guaranteed to be accurate.
Tracking "soft" objects
An object defined by several markers has to be "rigid" that means that markers must not move in relation to each other. Thus you can not track a "cloud" of markers for example on a T-Shirt to see how the material moves. You can define such objects, but when tracking them and it changes shape the software won't recognise this object anymore.Creating objects
 |
You can define a set of (minimum three) markers as a single rigid body.
|
Advanced Modelling
You can change an objects location and rotation relative to its markers after creation:- Pause the screen and get the object into view.
- By dragging the blue, red, or green lines you can move the object's center.
- If you only click the blue, red, or green line, a blue, red, and green circle appears with which you can change the object's orientation.
- Clicking (and not dragging) on one of the circles gets you back to the blue, red, and green lines.
If you select more than one marker, a virtual marker appears that you can snap to as well, e.g., to set the origin of an object exactly between two markers.
You can change an names of objects' markers after clicking on the triangle for more details right of the object to show you its details.
There you can also select and deselect certain markers if this is hard to do in the 3d-perspective (e.g., if they are covered by other markers or objects)
Developing Apps
Data reported by the Vicon
The Vicon streams information about all selected objects in the Tracker. The actual data reported is with respect to the center of the defined object, represented by a polygon. It is possible to manually change this center of these objects (see Advanced Modelling).
Name
The assigned name of each object can be accessed using its 'name' property.Note: While using i10 client apps like SimpleViconGLClient, iOSViconApp, and SimpleViconApp, the name might be appended with a whitespace at the end.
Position
The position (xPos, yPos, zPos) is measured with respect to the user-defined origin, and reported in millimetres. It can be accessed using the properties xPos, yPos, and zPos.Rotation
The Vicon Tracker also provides rotational information (xRot, yRot, zRot) of each object, reported in the range [0 - 2pi] radians.Be aware that the rotation information sent from the Vicon corresponds to the rotation in radian angle-axis.
Consider an object that is rotated with respect to the blue axis:
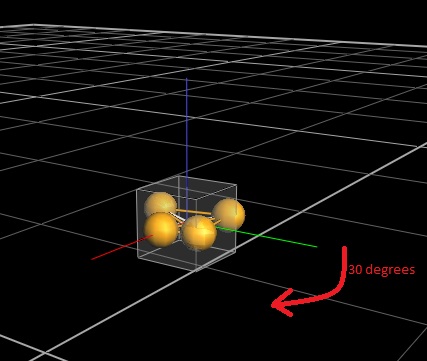 |
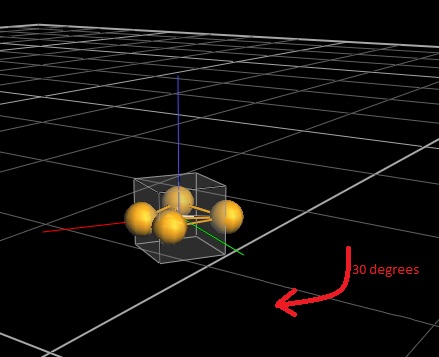 |
Ready-made Client Apps
There are some client apps available, which you can use a starting point for your own application. The git repositories are located at oliver/Public/Software/i10 Software/Vicon/.Note:After cloning the repository, please delete the .git folder
(rm -rf .git) from your clone-copy. This will prevent accidental pushes of your changes to the original copy.
ViconDataStream Framework
GIT: ssh://oliver.informatik.rwth-aachen.de/Public/Software/i10%20Software/Vicon/ViconDataStream%20Framework/ViconDataStreamFramework.gitThis cocoa framework makes streaming Vicon data to your application easy as pye. :) Check the guide page for more information
The following clients are deprecated. Use the framework above instead.
SimpleViconApp
GIT: ssh://oliver.informatik.rwth-aachen.de/Public/Software/i10%20Software/Vicon/SimpleViconApp.gitAn easy-to-use app which can initiate connections with the Vicon; displays the received objects and their positions.
The client uses Modern Objective-C with ARC (Automatic Reference Counting).
iOSViconApp
GIT: ssh://oliver.informatik.rwth-aachen.de/Public/Software/i10%20Software/Vicon/iOSViconApp.gitThe iOS version of the SimpleViconApp. Connect to the Vicon with your iPhone/iPad (via WiFi).
SimpleViconGLClient
GIT: ssh://oliver.informatik.rwth-aachen.de/Public/Software/i10%20Software/Vicon/SimpleViconGLClient.gitThis client is more complex, and a bit harder to grasp. It uses OpenGL to display the 3D positions of markers and objects on screen.
Does not use ARC; no automatic memory management!
Further documentation
The page "Developing for the Vicon Motion Capturing System" provides some further details about developing with the Vicon.Connecting an Eyetracker
Troubleshooting
Something is wrong with the Vicon MacBook
You can restore the MacBook to a safe state using the disk image on Oliver/Public/Motion Tracking Disk Images/Vicon Mac Image 05-31-2013.dmgVicon MacBook is unavailable (or) I want to use the Vicon Tracker on my own machine
You can run the Vicon Tracker on your Mac OS X machine by launching Windows XP inside a Virtual Machine, using Parallels.Refer to the section titled "Installing the Windows XP Virtual Machine on Mac OS X" for more information on how to do this.
The remote PoE control page does not load
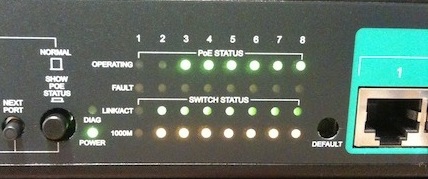
In that case, there is something wrong at RWTH's Rechenzentrum (RZ). The only way to get around this, is to temporarily connect the cameras to the Gigabit switches.Camera is not powered, not detected in the program
 |
|
My object is not being properly tracked
- Double-check whether you have correctly created your object (in the 'Objects' tab).
- If there are other similar objects present in the list, the Tracker might try to match your object to those other objects. Uncheck all irrelevant objects.
- Delete existing object and re-model it.
- If you still have problems, ensure that the camera set-up is appropriate for the object being tracked. Use the 'Camera' view to observe raw images of markers being tracked.
- Recalibrate the cameras once again.
- Consider adding more markers for more robust tracking.
'Set Origin' button does not work
This seems to be caused due to the messing up of some configuration file or application data. (Exact cause still unknown). To recover from this, do a fresh install of the Vicon Tracker program. Follow these steps:- Make a backup of the 'Vicon' folder located in "C:\Documents and Settings\All Users\Application Data (Hidden Folder). This contains saved data such as calibrations and objects.
- Make a backup of the license file ("lservrc") located in 'C:\Program Files\Vicon\Tracker\lservrc'
- Uninstall Vicon Tracker using 'Add or Remove Programs'
- Manually delete the following directories:
- C:\Program Files\Vicon
- C:\Documents and Settings\All Users\Application Data\Vicon
- C:\Documents and Settings\Vicon_user\Application Data\Vicon
- Reinstall Vicon Tracker 1.1 using the 'Tracker 1.1.52337 Installer' located on the Desktop
- Copy and paste the backup of the license file 'lservc' into the folder C:\Program Files\Vicon\Tracker. Replace the existing license file.
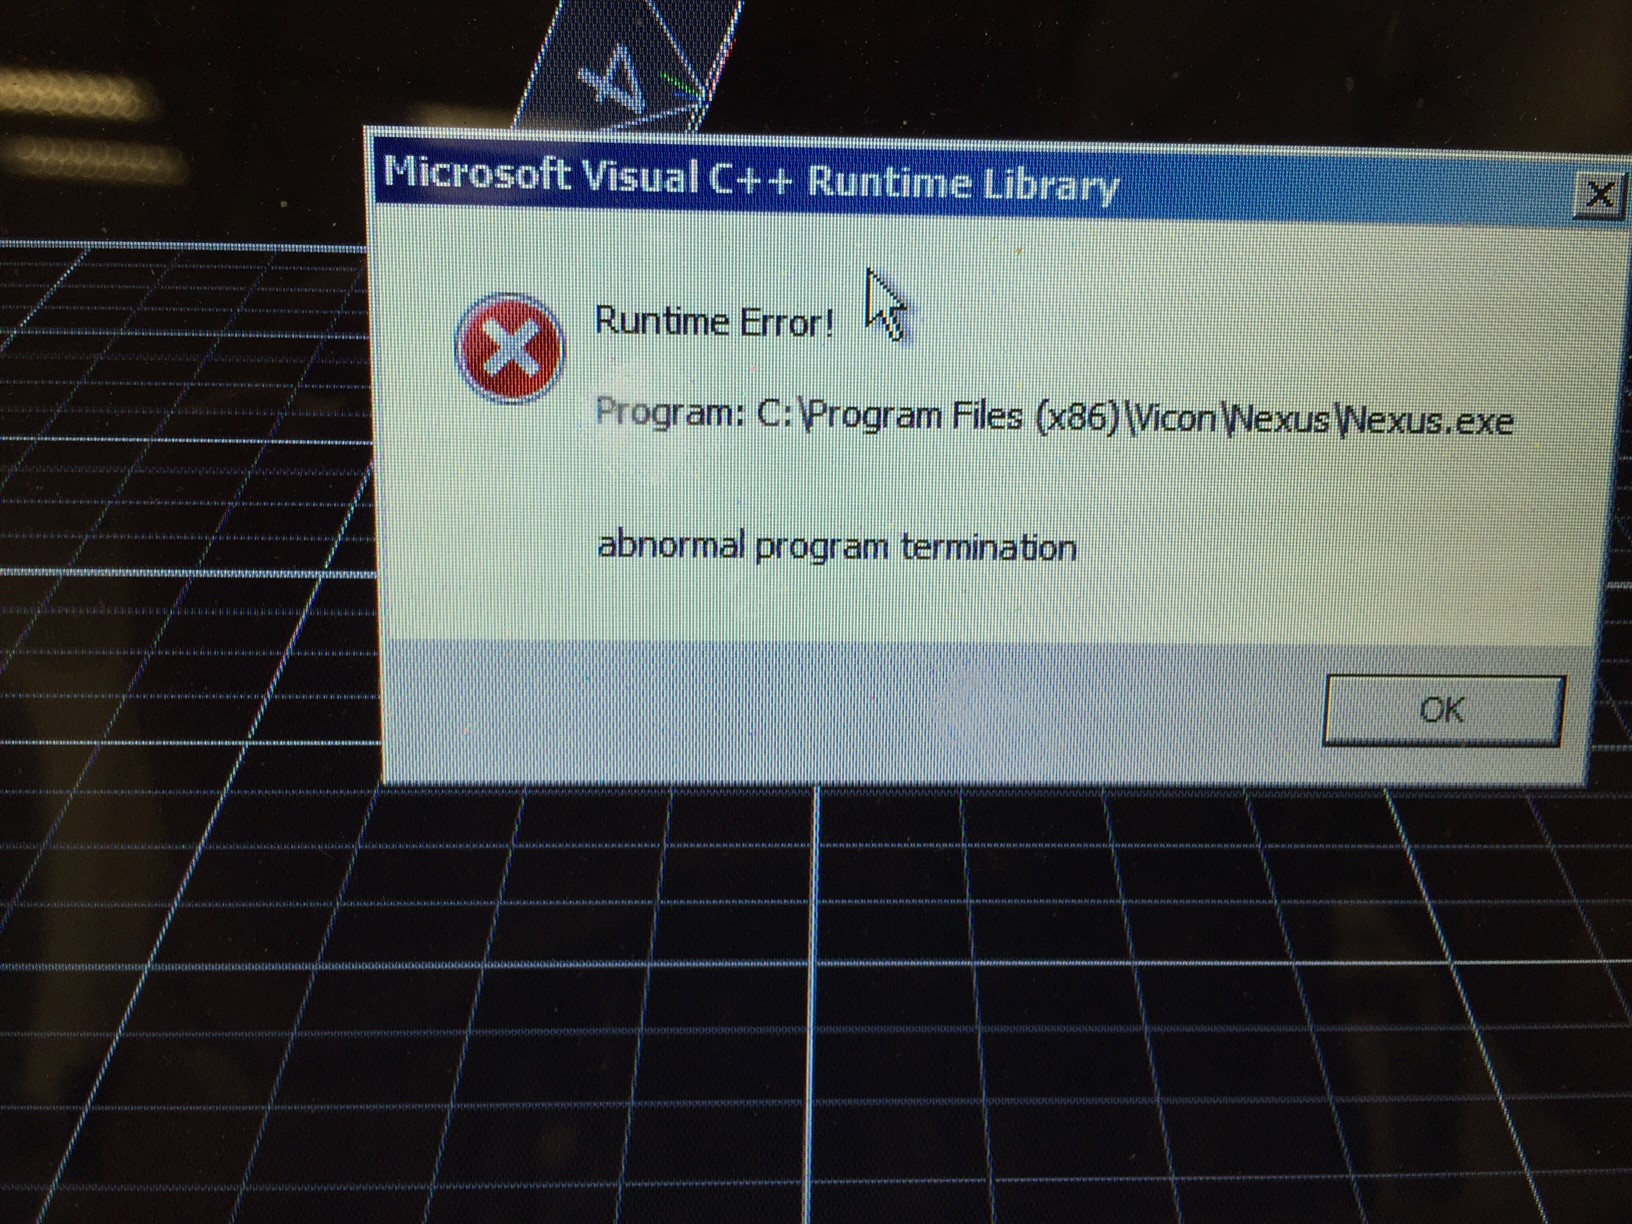
Runtime Error! abnormal program termination
 |
|
Links
Vicon usage schedule
| Date | Task | Person in charge |
|---|
Contact Us
For assistance regarding the Vicon system, feel free to contact the following people:Philipp Wacker
External usage
If you are interested in borrowing the Vicon system for your research, please take a look at this page.Vicon Support & Licensing (i10 internal-access only)
http://hci.rwth-aachen.de/vicon-supportFurther documentation
Bonita Quickstart GuideArchive
If you haven't found some information you are looking for, or want to view the previous version of the Vicon Guide, please visit:hci.rwth-aachen.de/guide_vicon_old