How to use the new Microsoft Exchange Server with Apple Mail and iOS Mail via IMAP
Update for Mac OS X 10.11 "El Capitan": Under 10.11, Apple Mail introduces an "Email Alias" field in its Account Preferences. You can use that instead of adding several email address aliases separated by commas as we did below. You still need to use the IMAP server as explained below, not Exchange.
You will need to change your email settings these days because the computing center is moving to a new server. Jan-Peter and I just did some experiments, and here’s what we currently recommend for Apple Mail (under Mac OS X 10.9 "Mavericks") and iOS 7 Mail:
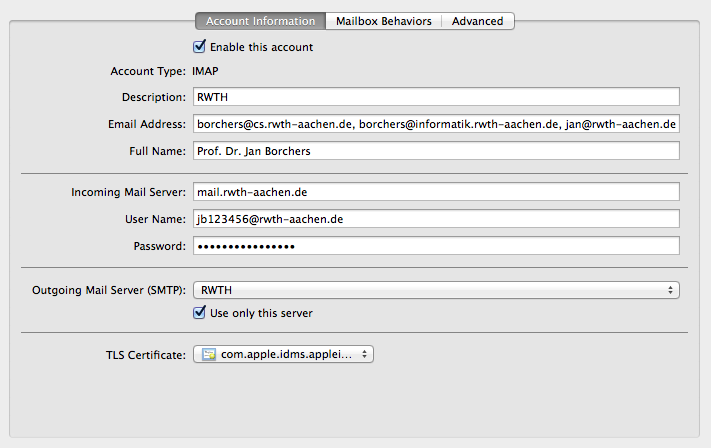
As you may know, many mail clients (like Apple and iOS Mail) let you put several email sender addresses into your sender's address field, separated by commas. You can then pick the address to use from a drop-down when composing an email. You don't need to create multiple email accounts in your email client for this. See the screenshot below for an example. You need this, e.g., to unsubscribe from unwanted newsletters etc. with the correct sender address that they used to sign you up, and it's also useful if you have different email addresses that automatically forward to your default address, but which you would still like to use as sender's address occasionally.
If you would like to keep the ability to send email from multiple sender addresses, do not create a new Exchange email account in Mail. Otherwise, the “Email address” field in the accounts pane will become greyed out and non-editable, forcing you to use only the one default email sender address for every email you send from this account.
Instead, just update the settings for your existing IMAP account. Here’s what mine look like. Not sure those are the recommended settings, but they work. Note that I get my email from the central mail.rwth-aachen.de server, although I use the @cs address a lot as sender address. The first screenshot shows the general IMAP account settings in Mail, the second one the SMTP Server settings (after you select the Outgoing Mail Server in the first dialog and click on "Edit SMTP Server List..."). The iOS setup looks very similar, and it's easy to enter the same data there.
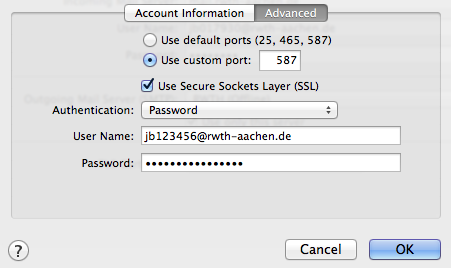
(Technical sidebar: The RWTH SMTP server mail.rwth-aachen.de lets you set your sending email address to an arbitrary address, as long as you authenticate with your correct username and password. This is what enables the above feature. However, this feature currently gets overridden and thus disabled by the Exchange server if you create an Exchange account instead of an IMAP account in your Mac OS X or iOS mail client.)
Syncing your IMAP mailboxes
Once you have set up IMAP with the new server, you should set up Apple Mail and iOS Mail to use the new names of your key IMAP folders that Exchange likes to use, because we found no way of renaming these on the Exchange server. Doing this ensures that you can, say, send an email from your iPhone and then find that email in your Sent messages on your Mac (and in the webmail interface). Here's how (we assume you have set up IMAP on your Apple devices already as above):
- Log into OWA (Outlook Web Access) at https://mail.rwth-aachen.de/owa/
- In the top right, go to Options -> See All Options -> Settings -> Regional
- Set language to "English (United States)" (if you prefer the German folder names, select that region instead)
- Check "Rename default folders to match the specified language"
- Click "Save" in the bottom right
- Click on Mail in the top left
Now your IMAP default folders have been renamed to "Drafts", "Sent Items", "Deleted Items", "Junk E-Mail", "Notes", "Inbox" and "Outbox" (instead of those German names you may have seen before). You may not like these names, but we have not found any way to get the Exchange server to rename these in other ways.
BTW: Calendar, Contacts, Journal and Notes are Exchange-specific folders that can't be removed via IMAP. Just leave them alone.
We occasionally ran into an issue where Exchange fails to rename those folders to the new language. In that case, keep the existing names and use them in the instructions below.
If you already had any of these folders, Exchange may have created a new folder like "Drafts1" and picked that as the default. In that case, rename your old folder ("Drafts" in this example) to something like "DraftsX". Then do the above language synchronization again. Exchange will then create and use a new "Drafts" folder for itself.
So now we need to make our Apple and iOS Mail clients use those same new folders. We'll start with Apple Mail:
- Open Apple Mail.
- Synchronize your RWTH account.
- Find your old drafts.
- Move them all into the new "Drafts" folder.
- Select the new "Drafts" folder
- From the menubar, select "Mailbox" -> "Use this Mailbox for..." -> "Drafts"
- Remove the old drafts folder that you just emptied (whatever it was called)
- Repeat from step 2, for all folders you want to sync (in my case, it was "Drafts", "Sent Items", "Deleted Items" and "Junk E-Mail").
Now Apple Mail should be using the same special mail folders as Outlook Webmail.
Now we make the iPhone use the same folders too:
- On the iPhone, open Settings -> Mail and select your RWTH account
- Tap on the account name
- Scroll down, select "Advanced >"
- Under Mailbox Behaviors, select the correct Exchange mailbox for each entry
- iOS may crash when trying to show an IMAP folder that you just deleted on your Mac. Just relaunch the Settings app.
- When you're done, go "< Back" to general Mail settings and remember to tap on "Done" to save these changes.
Verify by drafting, sending, and deleting email from iOS and Apple Mail, then syncing your accounts, to see if they all end up in the right places.